
The Art of Table Setting
with ORO VALENTIO
Showing Respect, Order, and Honor

In the Oro Valentio philosophy, the table is not merely a place of consumption—it is a place of encounter. It is where nourishment meets presence, where preparation meets gratitude, and where individuals gather not only to eat, but to be acknowledged, respected, and strengthened through shared experience. Table setting, therefore, is not decoration. It is discipline.
To prepare a table with intention is to make a statement—before a single word is spoken—that those who will sit there are worthy of care, order, and honor. Every element, from the placement of the plate to the alignment of utensils, communicates something deeper: “You matter. Your presence here is valued.”
Order Reflects Respect
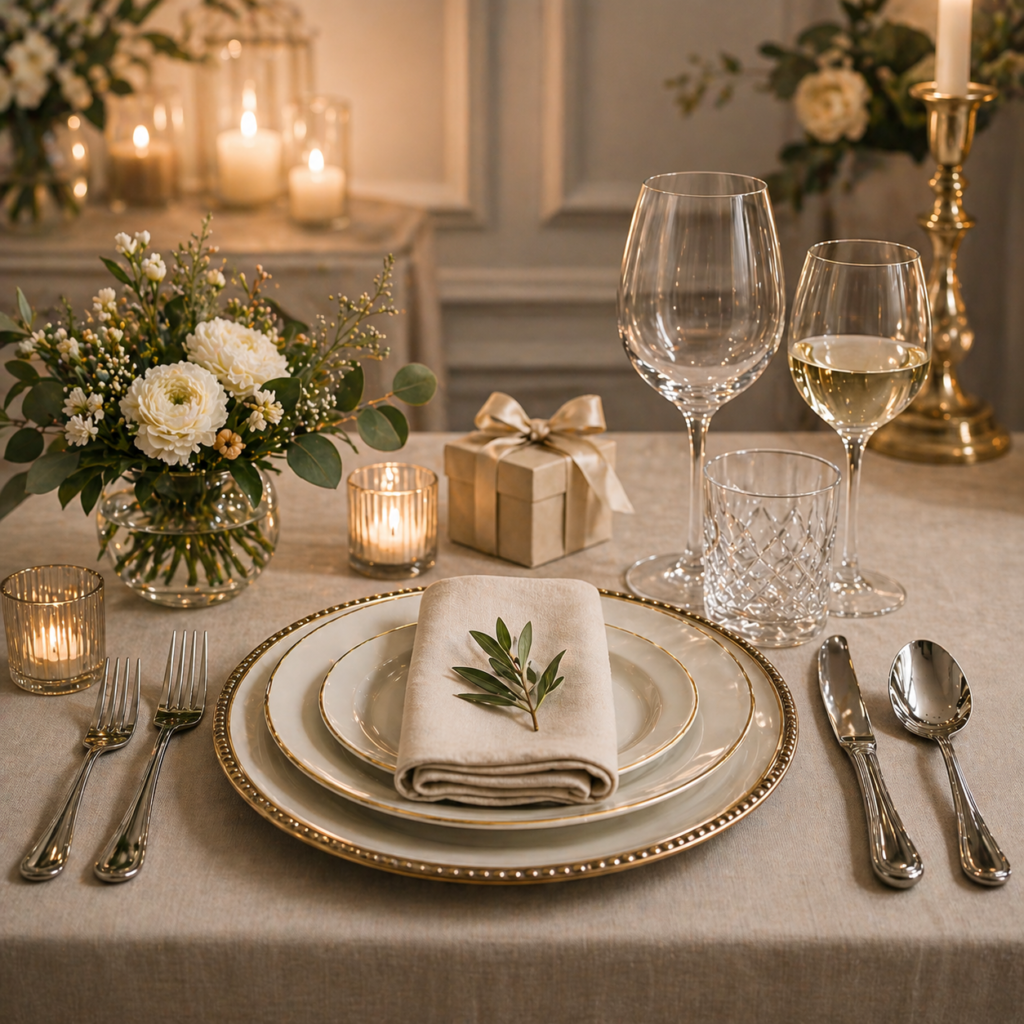
A properly set table reflects internal order. Clean lines, balanced spacing, and thoughtful arrangement demonstrate that the host has taken time to prepare—not out of obligation, but out of respect. Disorder at the table creates subtle tension. Order, on the other hand, creates ease.
When a guest approaches a well-set table, they instinctively feel oriented. They know where to sit, how to engage, and what to expect. This removes uncertainty and replaces it with quiet confidence. In this way, table setting becomes an act of leadership—guiding the experience before it begins.
Atmosphere Shapes Experience
Precision signals intention.
A centered plate, a polished glass, a neatly folded napkin—these details communicate that nothing about the gathering is careless. In Oro Valentio, this level of precision is not excess; it is a reflection of integrity. It demonstrates that the host does not approach even the smallest act without purpose.
A table is an environment.
The materials chosen—stone, glass, metal—the color palette, the lighting, and even the spacing between settings all influence the emotional tone of the meal. A well-composed table creates calm, focus, and presence. It invites conversation that is grounded rather than distracted.
This is especially important in a world of constant noise and fragmentation. The table becomes a place of restoration—where individuals can reconnect not only with each other, but with themselves.
To set the table well is to design that environment with care.

The Standard You Set
Every table you prepare establishes a standard—both for yourself and for those you invite into your space.
When you set a table with care, you quietly raise expectations. You encourage attentiveness, presence, and respect in return. Over time, this cultivates a culture where excellence becomes normal, and where even simple meals carry a sense of purpose and dignity.
Table setting is not about formality for its own sake. It is about intentionality. It is about honoring the moment, the meal, and the people who share it. It is a practice that transforms the ordinary into the meaningful. And in doing so, it becomes one of the simplest—and most powerful—ways to demonstrate respect.
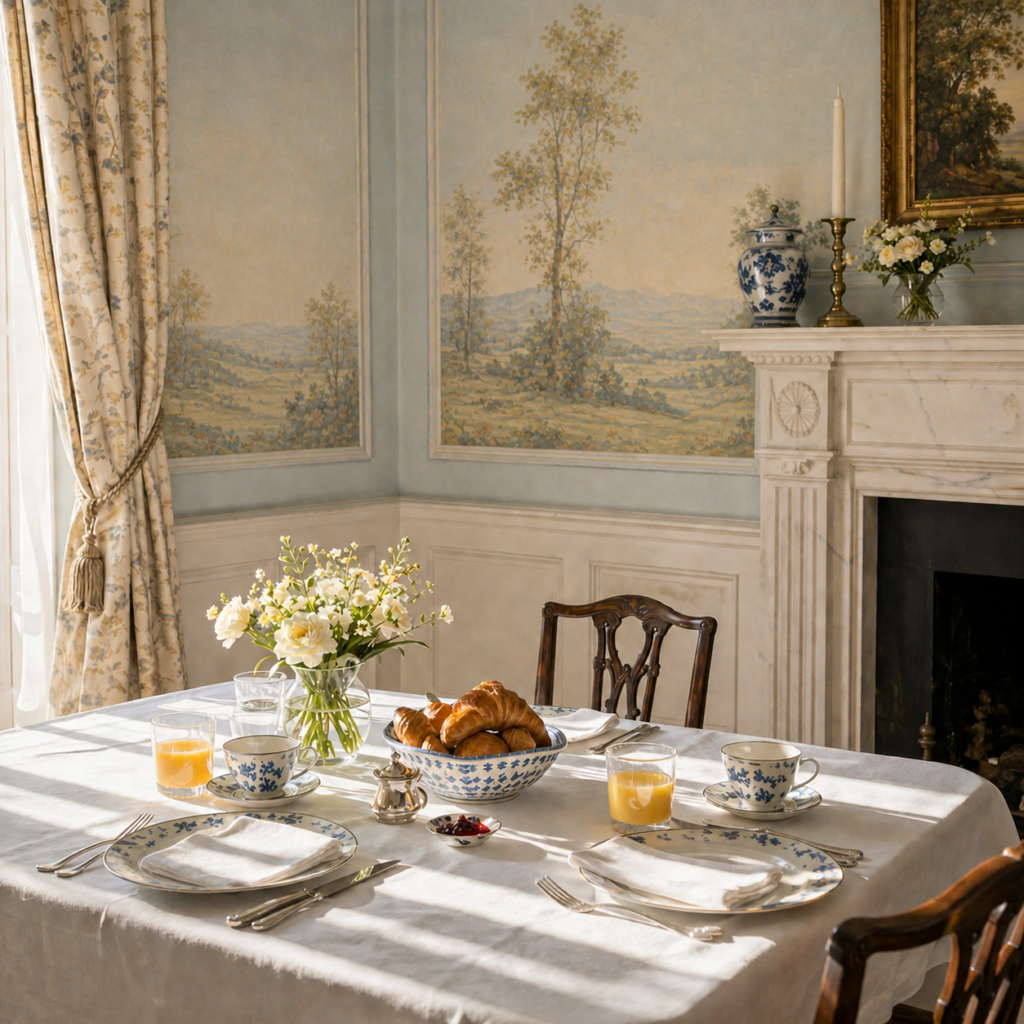
Setting the Foundation for the Atmosphere
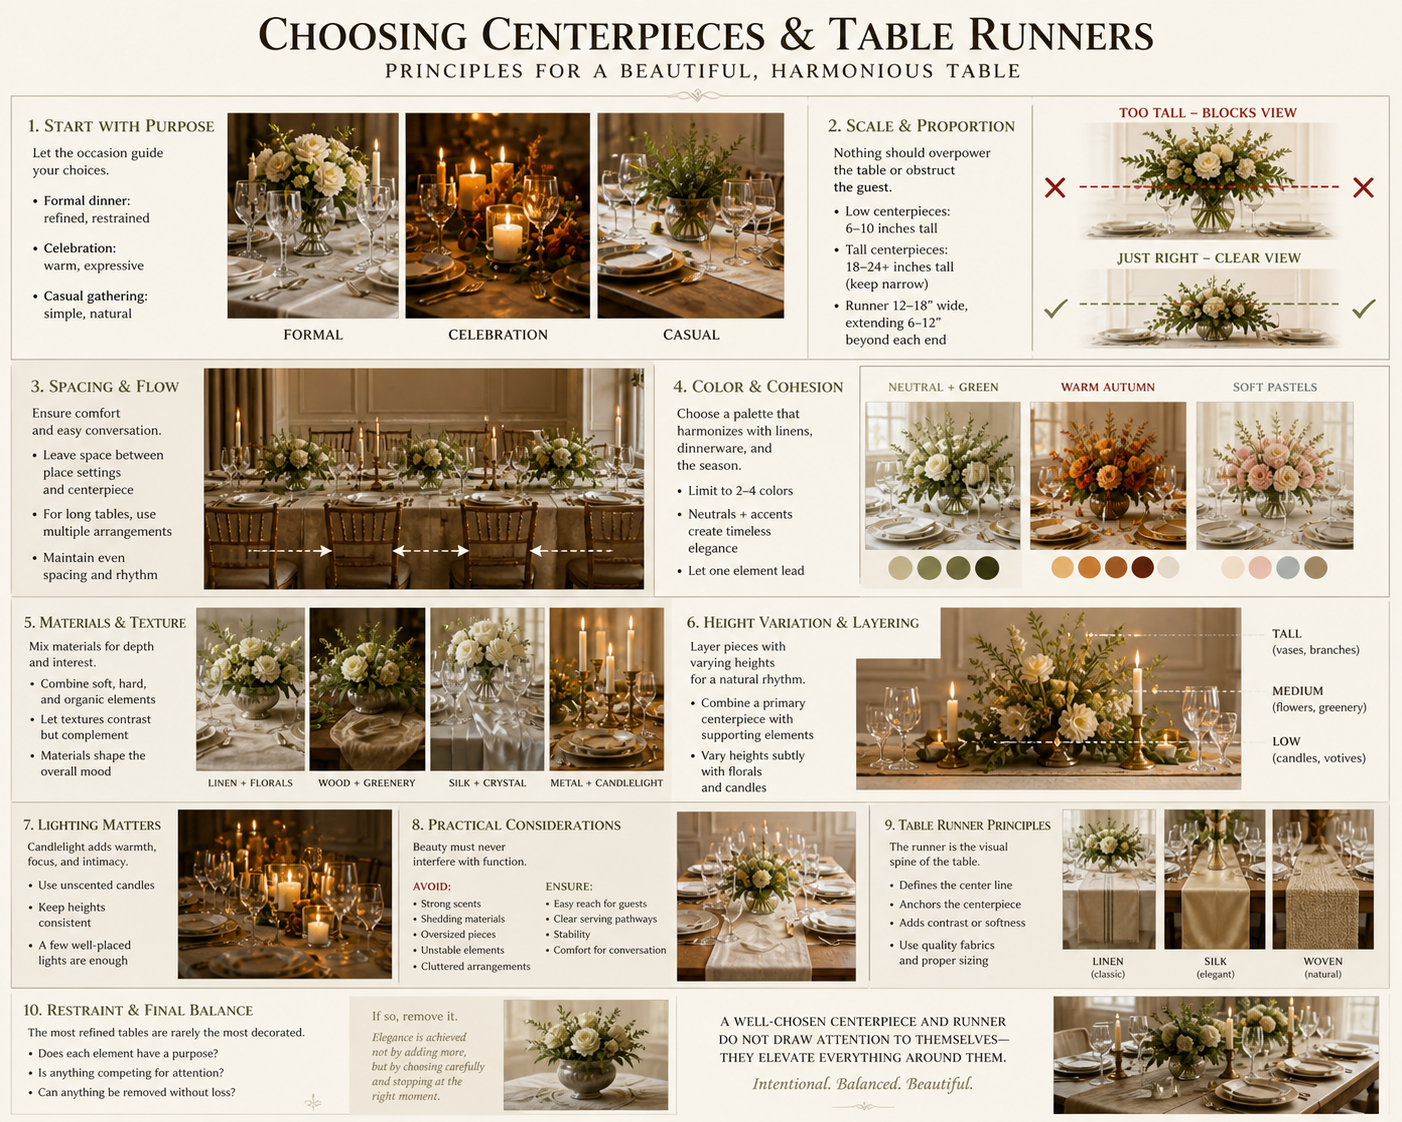
A well-chosen centerpiece does far more than decorate a table—it defines its atmosphere. Alongside it, the table runner serves as a visual anchor, guiding the eye and unifying the setting. Together, these elements shape the tone of the table before a single word is spoken, establishing whether the experience will feel refined, celebratory, or relaxed.
The process begins with purpose. Before selecting any decorative element, the intention of the gathering should be clearly understood. A formal dinner calls for restraint and structure, where each element is deliberate and refined. A celebration or holiday invites warmth and expression, often drawing from seasonal colors and textures. A casual gathering, by contrast, benefits from simplicity and a more natural approach. Every decision that follows—scale, color, material—should align with this intention. Without purpose, decoration becomes visual noise; with purpose, it becomes atmosphere.
From there, scale and proportion become essential. Nothing on the table should overpower the setting or obstruct the guest. Centerpieces should either remain low enough to allow for clear conversation—generally between six and ten inches—or rise taller with a narrow profile, allowing sightlines to pass beneath, typically beginning around eighteen inches. Table runners should complement, not dominate, the surface beneath them. A width of twelve to eighteen inches is standard, with a gentle extension of six to twelve inches beyond each end of the table. When proportion is respected, the table feels balanced rather than crowded.
Equally important is spacing and flow. A well-composed table is never filled; it is arranged. There should be intentional space between place settings and the centerpiece, and decorative elements should never interfere with plates, glassware, or the natural movement of service. On longer tables, a series of smaller, repeating arrangements often creates a more harmonious effect than a single oversized piece. Even spacing introduces rhythm, and rhythm brings calm.
Color plays a powerful but subtle role. It should unify rather than compete. A restrained palette—typically two to four tones—allows the table to feel cohesive. Neutrals such as white, cream, or stone provide a timeless base, while carefully chosen accents introduce depth and interest. In more formal settings, overly saturated or clashing tones disrupt the sense of refinement. It is often best to allow one element—whether florals, the runner, or the place setting—to lead, while the others support.
Material and texture further shape the emotional tone of the table. A linen runner paired with fresh florals feels soft and inviting. Wood or woven textures combined with greenery evoke a grounded, rustic character. Silk or satin runners with crystal or glass introduce formality and polish, while metallic accents paired with candlelight create a luminous elegance. The interplay of soft, hard, and organic textures adds depth, but restraint ensures clarity.
A strong table also incorporates subtle variation in height and layering. This is achieved by combining a primary centerpiece with supporting elements such as candles or smaller vessels. Heights should vary gently—low florals paired with medium-height candles, for example—while the runner provides a grounding line beneath. Too many competing heights or uneven layering disrupts the composition. The goal is a quiet visual rhythm, not distraction.
Lighting, in many cases, becomes the most powerful centerpiece of all. Candlelight introduces warmth, focus, and intimacy in a way few other elements can. Unscented candles are preferred to avoid interfering with the meal, and their heights should remain consistent to maintain visual order. A few well-placed lights are often more effective than an abundance. Light should enhance the table, not dominate it.
Practical considerations must always remain at the forefront. Beauty should never interfere with function. Strongly scented flowers, shedding materials, oversized arrangements, or unstable pieces can quickly detract from the experience. Guests should have easy access to their place settings, and service pathways should remain clear. A successful centerpiece supports the meal—it does not compete with it.
The table runner, though often understated, plays a critical structural role. It acts as the visual spine of the table, defining the center line and anchoring the centerpiece. It may be placed over a tablecloth for added depth or used alone on a bare table for a more modern effect. Regardless of style, it should be properly sized, smooth, and free of distracting patterns. Its role is to support the composition quietly and effectively.
In the end, restraint defines true refinement. The most elegant tables are rarely the most decorated. Each element should serve a purpose, and anything that competes for attention or feels unnecessary should be removed. Elegance is not achieved by adding more, but by choosing carefully—and stopping at the right moment.
A centerpiece is not simply placed; it is composed. A runner is not simply laid; it is aligned. Together, they create a setting that feels intentional, balanced, and complete. When chosen well, they do not draw attention to themselves—they elevate everything around them, transforming the table from a surface into an environment shaped with care.
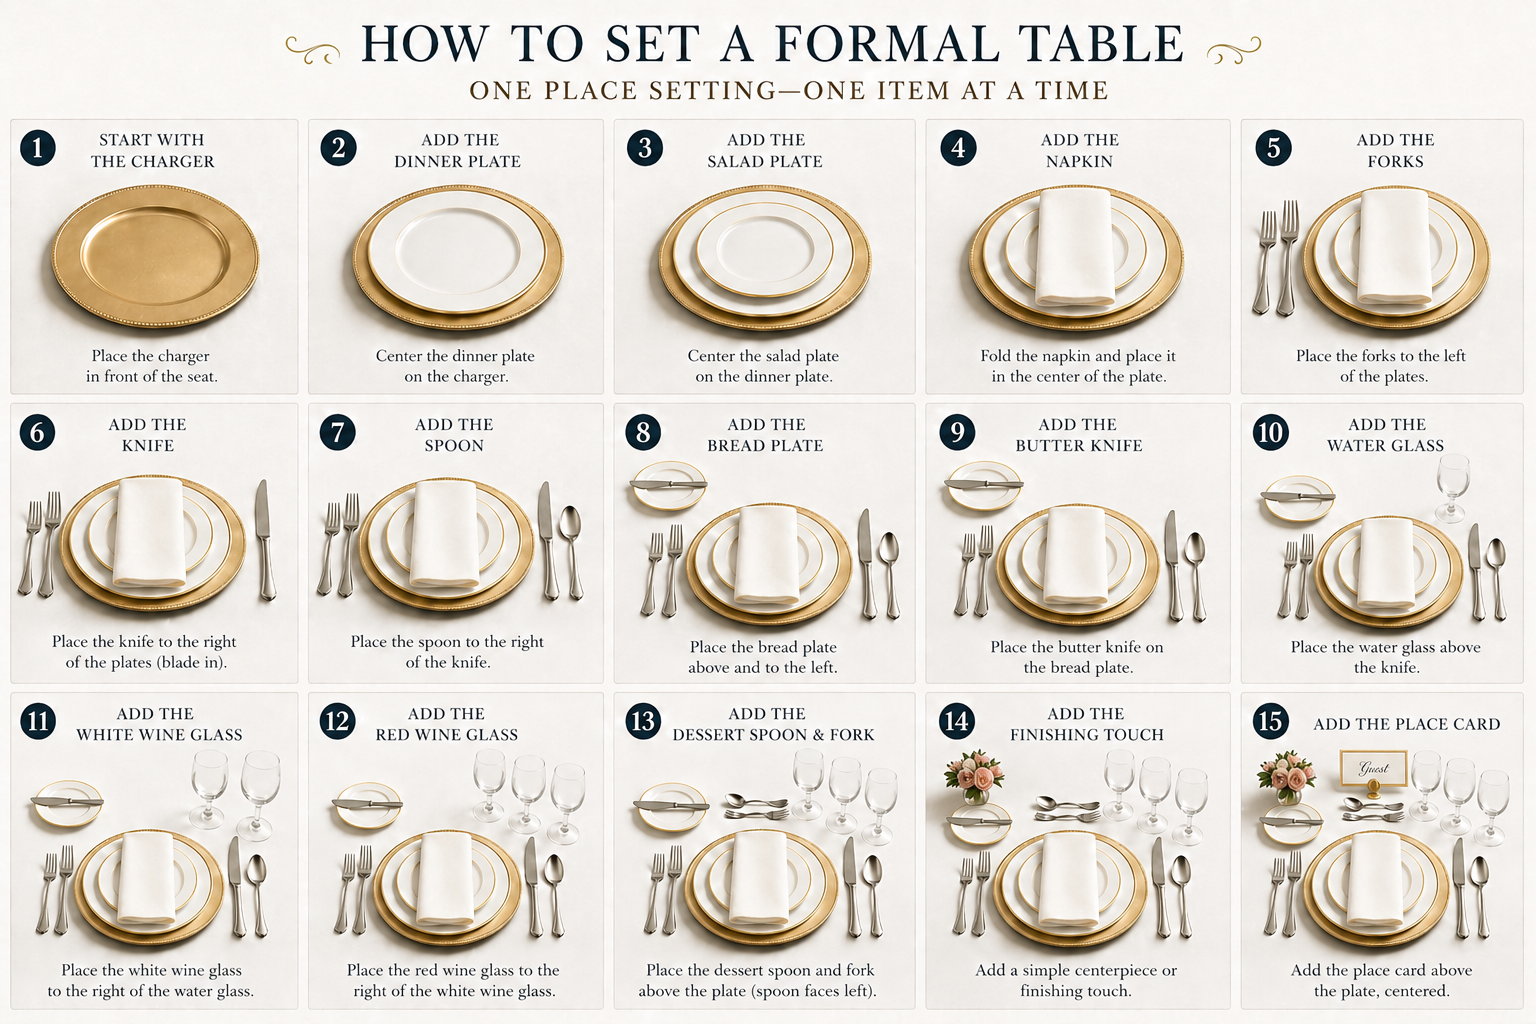
A Structured Approach to Table Setting
A refined table is built through deliberate steps, each one contributing to clarity, balance, and cohesion.
A well-set table is not about formality for its own sake—it is about intention. It is a quiet but powerful way to demonstrate respect, to create an environment of clarity and presence, and to elevate the experience of gathering. Through discipline in preparation and care in detail, the table becomes more than a setting—it becomes a reflection of values. When you are finished setting the table, step back and evaluate the table as a whole. Every element should feel balanced, symmetrical, and resolved. Small adjustments can make a significant difference.
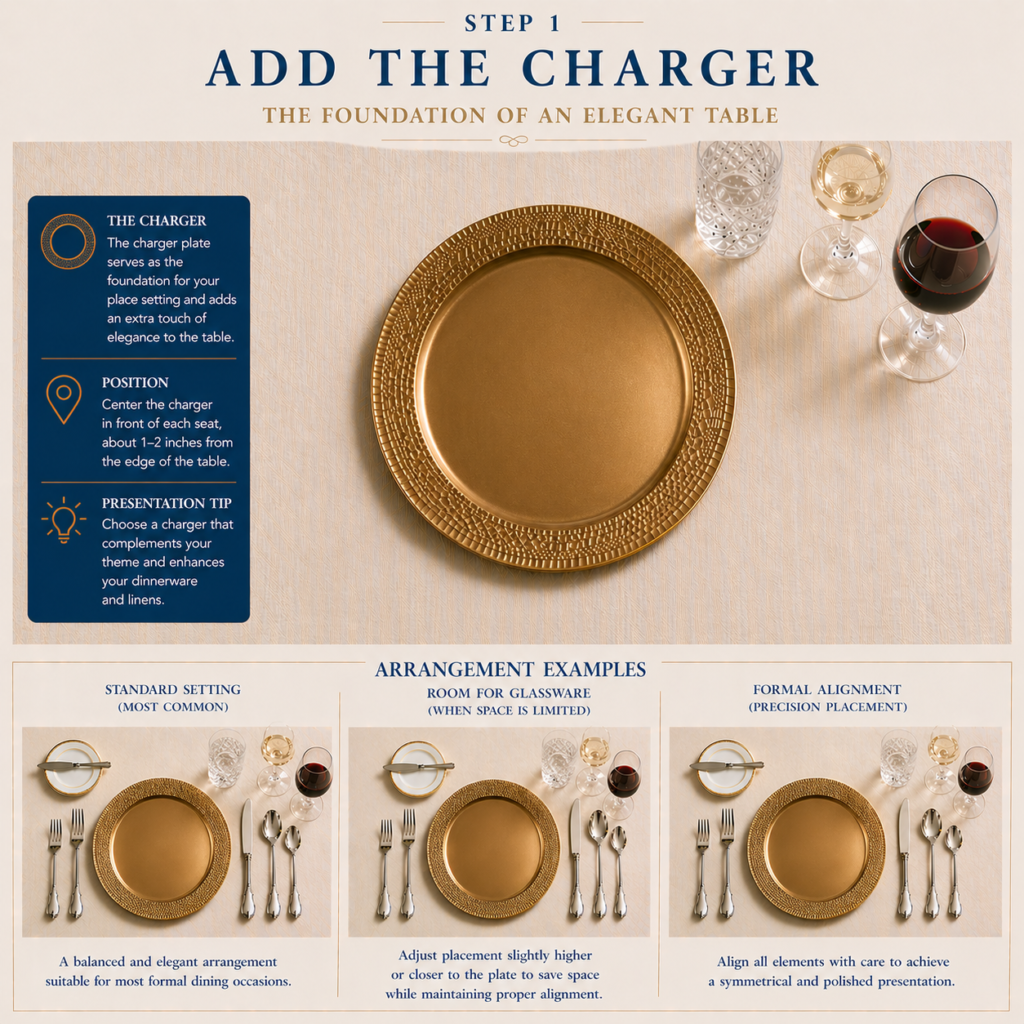
Step 1. Charger
Begin by placing a charger plate at each seat. This serves as the visual anchor or foundation of the entire setting and establishes alignment for everything that follows.
Placement: Center the charger directly in front of the chair, allowing approximately 1 inch from the table edge to the bottom of the charger. Each place setting should span 24–30 inches in width to maintain balance and comfort.
Alignment: All elements of the setting should align in clean, invisible lines—the charger defines this structure. Precision here is what creates a truly formal appearance.
Material & Quality: Choose a charger of refined, durable quality—common materials include:
Porcelain or fine china (traditional, timeless)
Metal (gold, silver, or stainless for a polished, elevated look)
Glass or crystal (light, elegant, and versatile)
The finish should be clean, consistent, and free of wear, as the charger is highly visible throughout the meal.
Purpose: The charger is not used for eating. Its role is to:
Frame the place setting
Provide a base for courses (such as soup or salad plates)
Protect the table or linens from heat and spills
When it is removed: The charger remains in place through the early courses and is removed just before the entrée (main course) is served.
Step 2. Dinner Plate (If Pre-set)
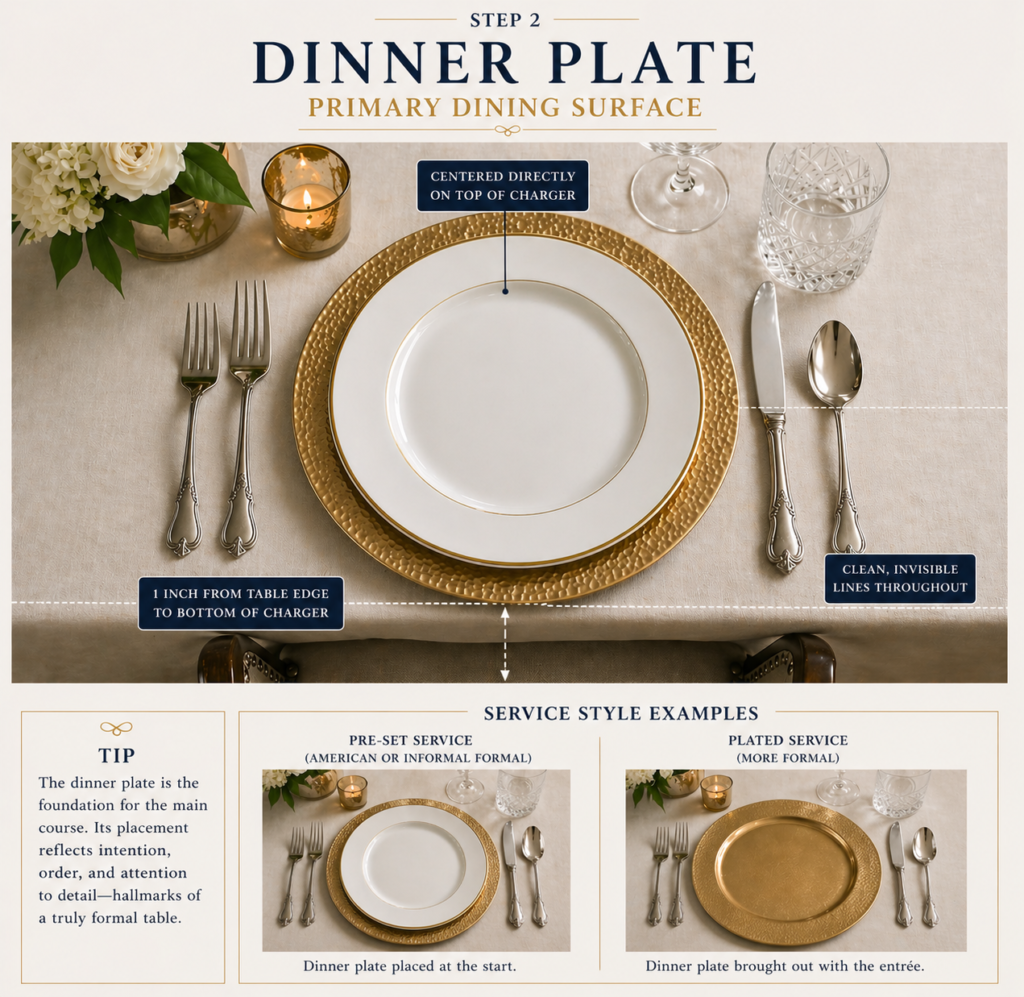
Place the dinner plate directly on top of the charger when the service style calls for it. This is the main dining surface and becomes the focal point once the meal progresses.
Placement: The dinner plate should be centered precisely on top of the charger, maintaining the same alignment established in the first step. It must sit perfectly balanced, reinforcing the clean, structured lines of the setting.
Alignment: The plate should follow the same invisible vertical and horizontal axes created by the charger and chair. Any deviation becomes noticeable at a formal table, so precision is essential.
Material & Quality: Select a dinner plate of high-quality porcelain, fine china, or premium ceramic. Ideal characteristics include:
A smooth, even glaze
Consistent color and finish
Subtle detailing (such as a fine rim or delicate pattern)
The plate should complement the charger without competing with it.
Service Style Consideration: The dinner plate is not always placed at the beginning. Its presence depends on how the meal is served:
Pre-set (American or informal formal service): The plate is placed at the start
Coursed or plated service (more formal): The plate is brought out with the entrée
In more refined settings, this second approach is often preferred for cleanliness and presentation.
Purpose: The dinner plate serves as the primary vessel for the main course, replacing earlier course plates that may have been set atop the charger.
When it is removed: The dinner plate is cleared after the main course is finished, after which the table is prepared for dessert service.
Linens (optional but traditional)
Tablecloth
Crisp, pressed
Drop: 10–12 inches on all sides
Placemat (if no tablecloth)
Centered at each seat
Charger will sit on top
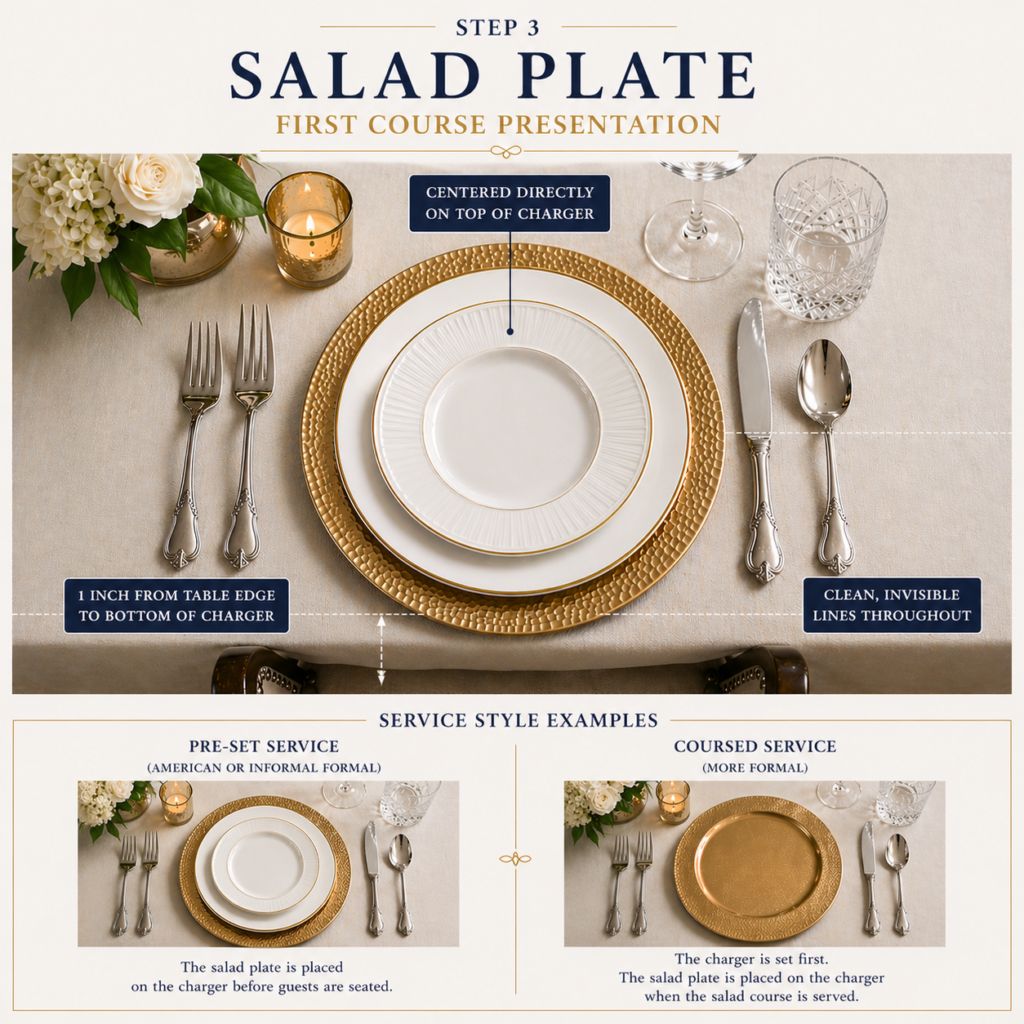
Step 3. Salad Plate
The salad plate is placed on top of the charger when the first course is served or pre-set, depending on the service style. It introduces the dining experience and sets the tone for the courses to follow.
Placement: The salad plate should be centered directly on top of the charger, maintaining the same precise alignment established in the previous steps. It should sit evenly and proportionally, creating a clean, layered look.
Alignment: The plate must follow the same invisible vertical and horizontal axes formed by the charger and chair. Consistency in alignment is essential to preserve the formal structure of the setting.
Material & Quality: Select a salad plate that complements the dinnerware while maintaining a refined presence. Common materials include:
-
Porcelain or fine china (most traditional)
-
High-quality ceramic with a smooth finish
Ideal characteristics: Smooth, even glaze
-
Consistent color and tone
-
Subtle detailing that coordinates with the dinner plate
The salad plate should feel cohesive within the set, not visually dominant.
Service Style Consideration: The salad plate may or may not be placed at the beginning:
-
Pre-set service (American or informal formal):
The salad plate is placed on the charger before guests are seated
-
Coursed service (more formal or European Style):
The salad plate is brought out with the salad course
In more formal settings, bringing it out fresh helps maintain cleanliness and presentation.
Purpose: The salad plate serves as the vessel for the first course, typically a salad or light starter. It creates the first functional dining layer on top of the charger.
When it is removed: The salad plate is cleared after the first course is finished, returning the table to the charger base before the next course is presented.
Step 4. Napkin
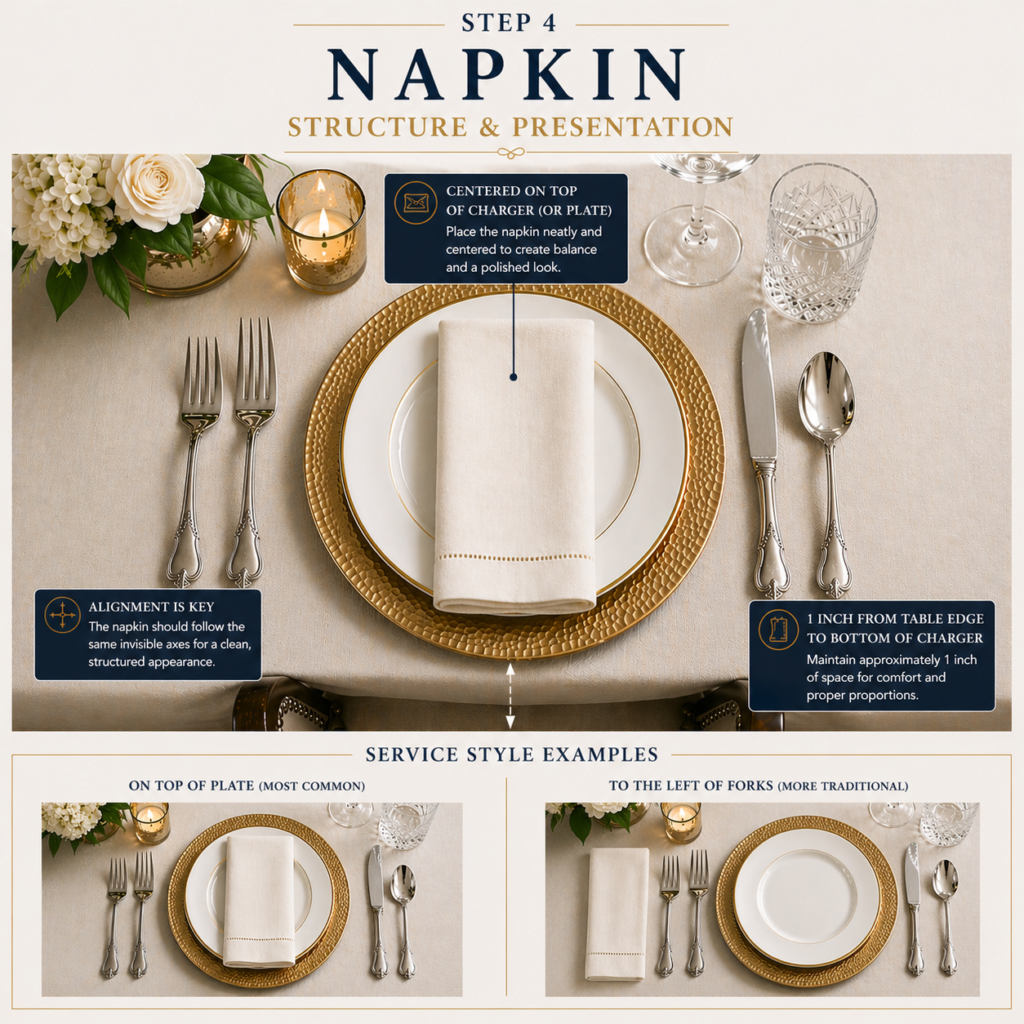
The napkin is placed as part of the initial setting and serves both a functional and aesthetic role. It completes the place setting visually while preparing the guest for the dining experience.
Placement: The napkin is typically placed centered on top of the charger (or plate, if present), or to the left of the forks in more traditional layouts. For a refined, modern formal setting:
Centering it on the plate or charger is most common
It should sit neatly and proportionally within the setting
Alignment: The napkin should follow the same invisible vertical and horizontal axes established by the charger and plate.
If placed on the plate: it should be perfectly centered
If placed to the left: it should align cleanly with the fork edges
Precision ensures the table maintains a balanced, structured appearance.
Material & Quality: Select a napkin of high-quality fabric, never paper, for a formal setting. Common materials include:
Linen (most traditional and preferred)
Cotton (refined and slightly more relaxed)
Ideal characteristics:
Crisp, clean pressing
Substantial weight (not thin or flimsy)
Smooth texture with minimal wrinkling
Color should either:
Coordinate with the table palette
Or provide a subtle, intentional contrast
Folding Style Consideration: The fold should be clean, structured, and not overly elaborate. Common formal folds:
Rectangle (classic and minimal)
Simple tri-fold
Softly folded square
Avoid overly decorative or complex folds in formal settings, as they can feel excessive or distract from the table’s refinement.
Purpose: The napkin serves to:
Provide practical use for the guest
Enhance the visual composition of the setting
Introduce texture and softness to the overall design
It is both a utility piece and a design element. When it is used, the napkin is:
Placed in the guest’s lap upon being seated
Used throughout the meal as needed
It remains with the guest and is not removed during service.
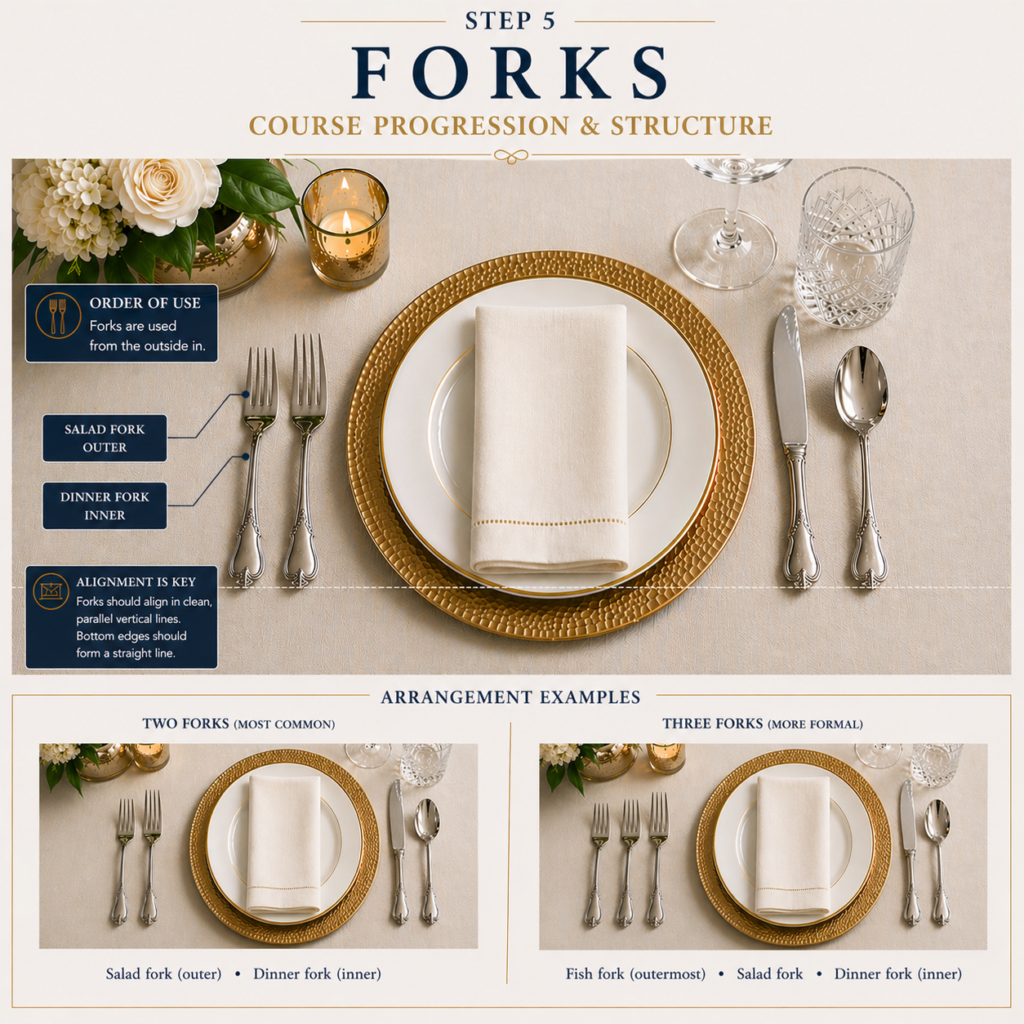
Step 5. Forks
The forks are placed as part of the initial setting and reflect the sequence of courses to be served. Their arrangement communicates order, structure, and the flow of the meal.
Placement: Forks are placed to the left of the charger or plate, arranged in the order they will be used.
The dinner fork sits closest to the plate
The salad fork is placed to the left of the dinner fork
Additional forks (if used) continue outward in order of use.
Alignment: All forks should align in clean, parallel vertical lines, maintaining the same structured axes established by the charger and plate.
The bottom edges of the forks should form a straight horizontal line
The handles should be evenly spaced and parallel
Precision here reinforces a balanced, formal appearance.
Material & Quality: Select forks of high-quality metal, typically:
Stainless steel (most common and practical)
Silver-plated or sterling silver (more traditional and formal)
Ideal characteristics:
Balanced weight
Smooth, polished finish
Consistent design across all pieces
The forks should feel substantial and refined, never lightweight or mismatched.
Arrangement Consideration: The number of forks depends on the courses being served.
Two forks (most common):
Salad fork (outer)
Dinner fork (inner)
Three forks (more formal):
Fish fork (outermost, if applicable)
Salad fork
Dinner fork
Forks are always used from the outside in, following the progression of the meal.
Purpose: The forks serve to:
Support the sequence of dining courses
Maintain order and clarity for the guest
Contribute to the visual symmetry of the setting
They are both functional tools and structural elements of the table design.
When they are used and removed:
Each fork is used in order of placement, beginning with the outermost
After each course, the used fork is cleared with the plate
Remaining forks stay in place until their corresponding course is served.

Step 6. Knife
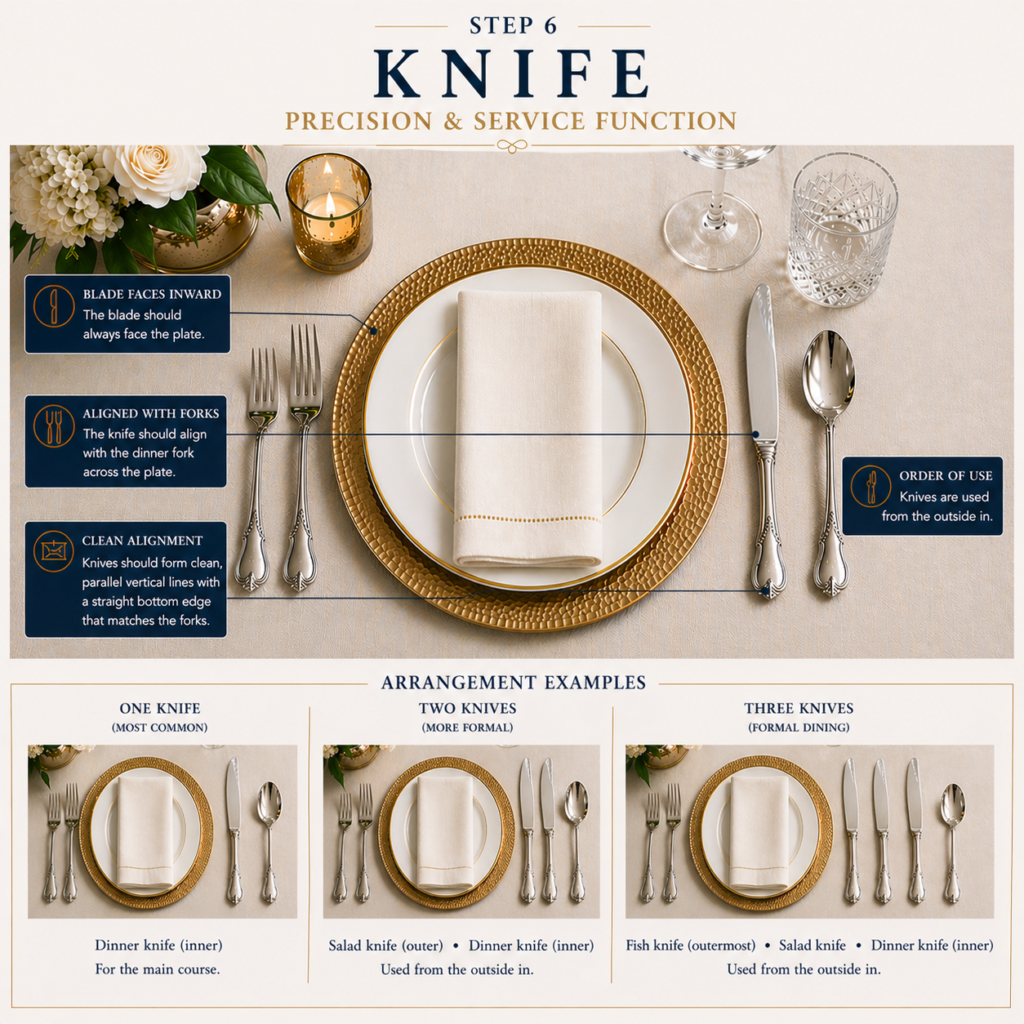
The knife is placed as part of the initial setting and corresponds to the main course and any courses requiring cutting. Its position and orientation reflect both function and refinement within the overall structure.
Placement: The knife is placed to the right of the charger or plate, aligned with the dinner fork on the opposite side.
-
The dinner knife sits closest to the plate
-
Additional knives (if used) are placed to the right in order of use
The blade should always face inward toward the plate, symbolizing readiness for use and maintaining proper etiquette.
Alignment: All knives should align in clean, parallel vertical lines, mirroring the structure established by the forks.
-
The bottom edges of the handles should form a straight horizontal line with the forks
-
The knives should sit evenly spaced and parallel to one another
This symmetry ensures a balanced and formal presentation.
Material & Quality: Select knives of high-quality metal, typically:
-
Stainless steel (most common and durable)
-
Silver-plated or sterling silver (more traditional and formal)
Ideal characteristics:
-
Sharp, well-maintained edge
-
Smooth, polished finish
-
Balanced weight and comfortable grip
-
Consistent design with the rest of the flatware
The knife should feel substantial, precise, and refined.
Arrangement Consideration: The number of knives depends on the courses being served.
-
One knife (most common):
-
Dinner knife (for the main course)
-
-
Two knives (more formal):
-
Salad knife (outer, if applicable)
-
Dinner knife (inner)
-
-
Additional knife (formal dining):
-
Fish knife (placed outermost when a fish course is served)
-
Like forks, knives are used from the outside in, following the progression of the meal.
Purpose: The knife serves to:
-
Assist in cutting and preparing food
-
Support the sequence of dining courses
-
Maintain clarity and order for the guest
It is both a functional tool and a structural counterpart to the forks.
When it is used and removed:
-
Each knife is used in order of placement, beginning with the outermost
-
After each course, the used knife is cleared with the plate
Remaining knives stay in place until their corresponding course is served.
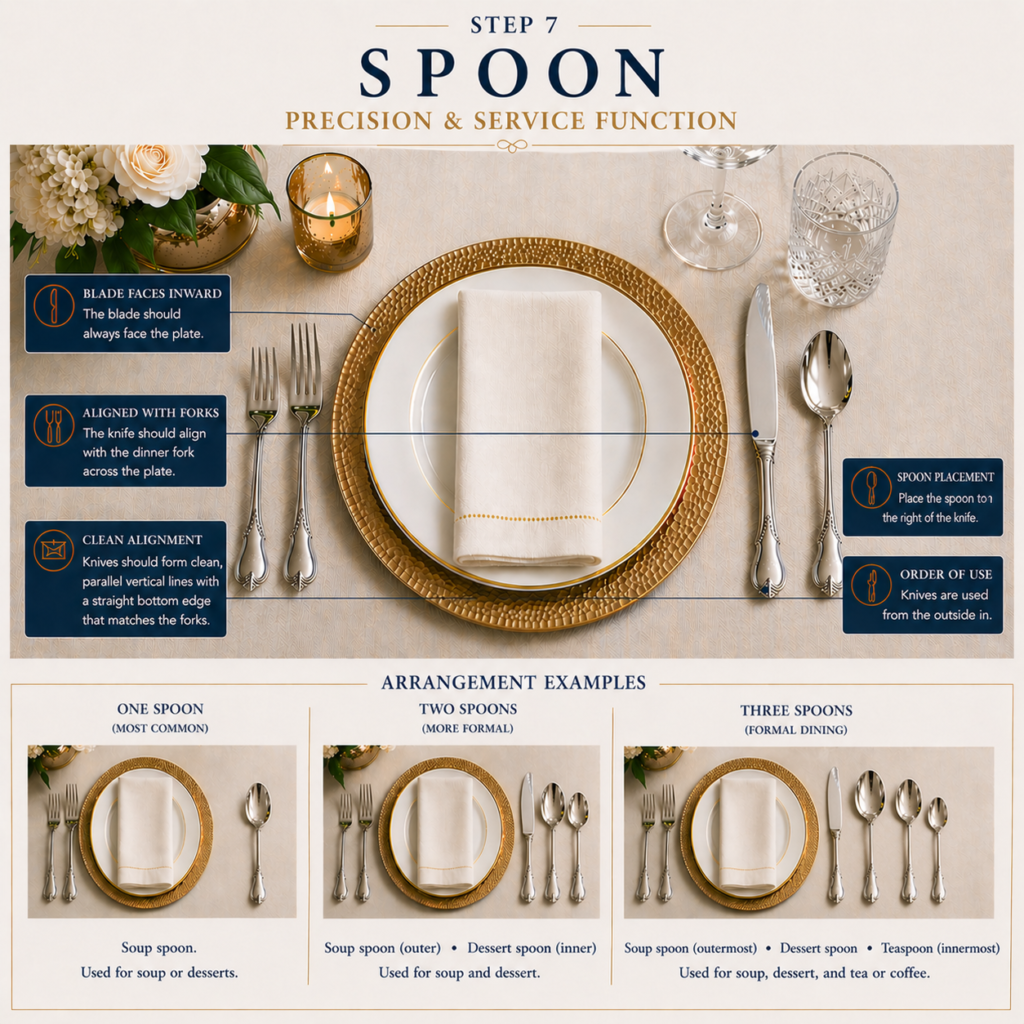
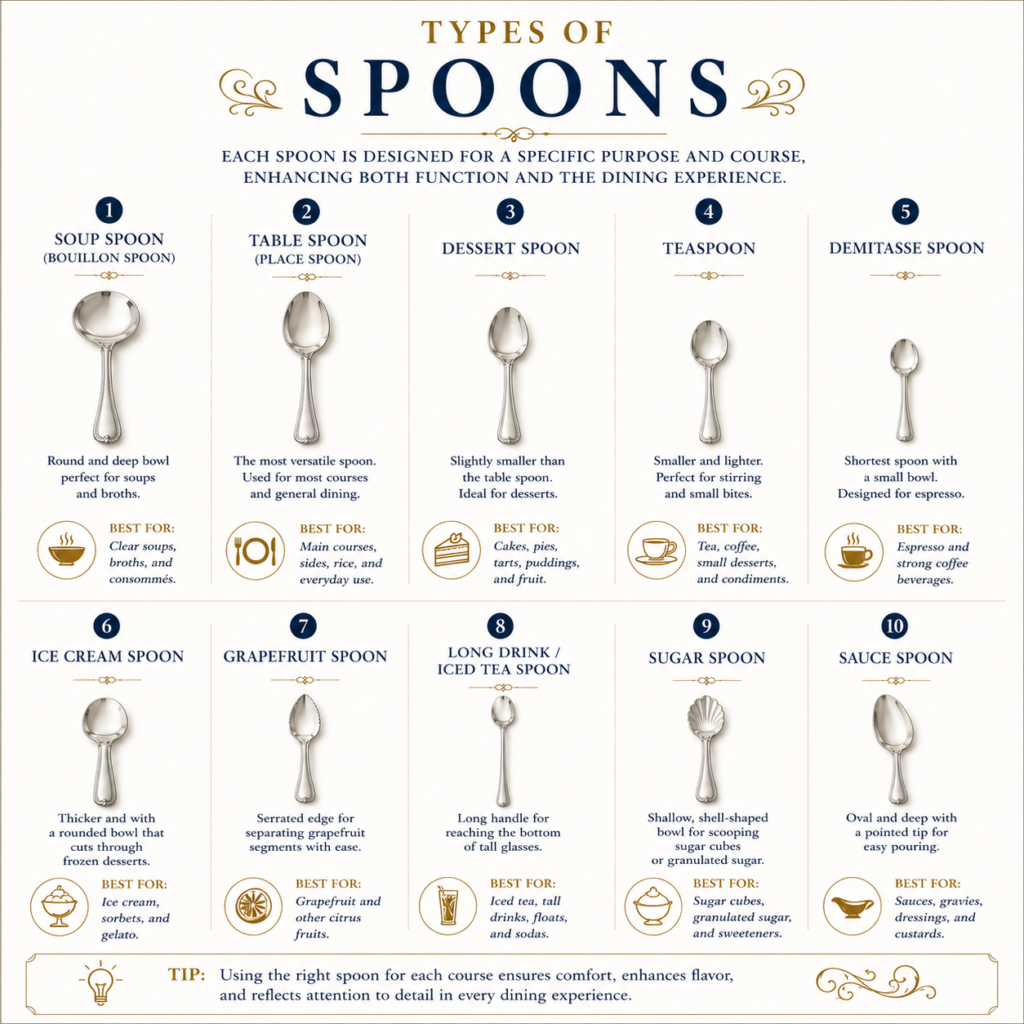
Step 7. Spoon(s)
The spoon is placed as part of the initial setting and corresponds to courses that require it, most commonly soup and sometimes dessert. Its placement completes the flatware arrangement and reinforces the balance and symmetry of the setting.
Placement: Spoons are placed to the right of the knives, arranged in the order they will be used.
The soup spoon is typically placed to the right of the dinner knife
Additional spoons (if used) are placed further to the right in order of use
In many formal settings, the dessert spoon is not pre-set and is instead brought out with the dessert course.
Alignment: All spoons should align in clean, parallel vertical lines, consistent with the knives and forks.
The bottom edges of the handles should form a straight horizontal line with the rest of the flatware
The spoons should be evenly spaced and parallel
This maintains a cohesive and structured appearance across the setting.
Material & Quality: Select spoons of high-quality metal, typically:
Stainless steel (most common and practical)
Silver-plated or sterling silver (more traditional and formal)
Ideal characteristics:
Smooth, polished bowl
Balanced weight
Comfortable handle
Consistent design with the rest of the flatware
The spoon should feel refined, substantial, and cohesive within the set.
Arrangement Consideration: The number and type of spoons depend on the courses being served.
One spoon (most common):
Soup spoon
Additional spoons (more formal):
Dessert spoon (often brought with dessert rather than pre-set)
Specialty spoons (rare, depending on menu)
Like other flatware, spoons are used from the outside in, following the progression of the meal.
Purpose: The spoon serves to:
Assist in consuming liquid or soft courses
Support the sequence and clarity of the meal
Contribute to the visual balance of the place setting
It completes the flatware arrangement both functionally and structurally.
When it is used and removed:
Each spoon is used in order of placement, beginning with the outermost
After the course, the used spoon is cleared with the plate or bowl
Spoons not yet used remain in place until their corresponding course is served.
Step 8. Bread Plate
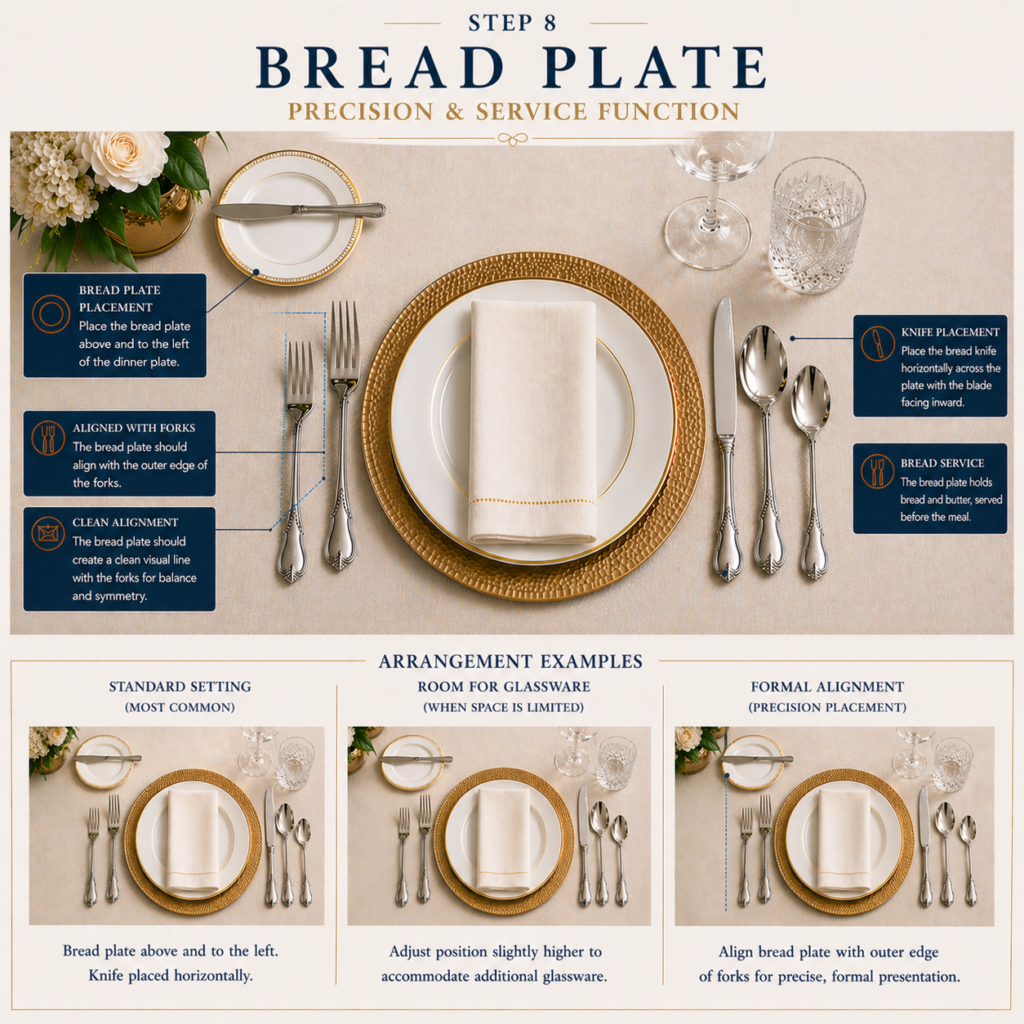
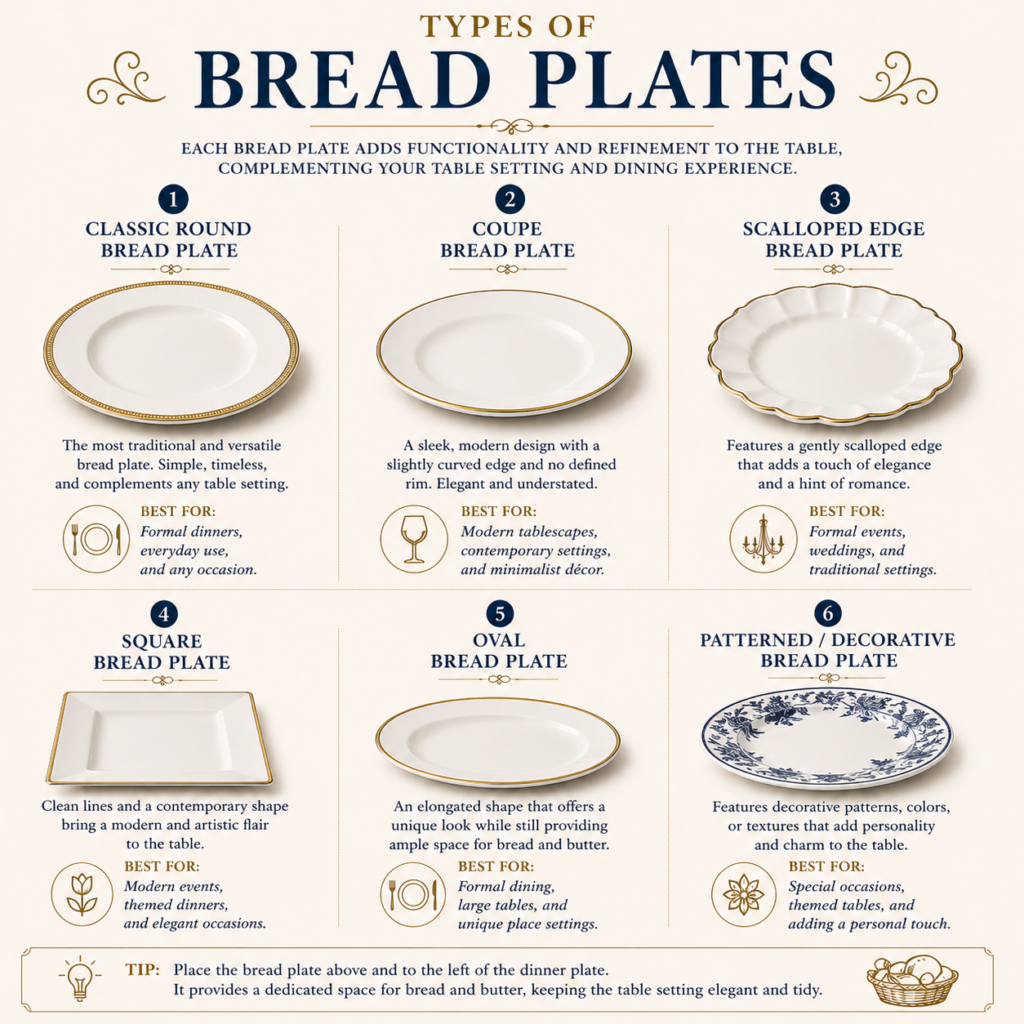
The bread plate is placed as part of the initial setting and serves as the designated surface for bread and butter service. It adds both function and visual balance to the upper left portion of the place setting.
Placement: The bread plate is positioned above and to the left of the charger or dinner plate (at 10–11 o’clock).
-
It sits above the forks, slightly offset from the main plate
-
The center of the bread plate typically aligns with the left edge or upper-left quadrant of the charger
It should feel clearly associated with the place setting without crowding the main plate area.
Alignment: The bread plate should follow the same invisible structural lines as the rest of the setting.
-
It should align horizontally with the glassware cluster on the right
-
It should maintain consistent spacing from the forks and main plate
This creates a balanced left-right symmetry across the setting.
Material & Quality: Select a bread plate that matches or complements the primary dinnerware.
Common materials include:
-
Porcelain or fine china (most traditional)
-
High-quality ceramic
Ideal characteristics:
-
Smooth, even glaze
-
Consistent color and finish
-
Subtle detailing that coordinates with the main plate
The bread plate should feel cohesive and refined, not visually dominant.
Accompaniment Placement: The bread plate is typically paired with a butter knife (butter spreader).
-
The butter knife is placed horizontally across the top of the bread plate
-
The blade faces downward or inward toward the plate
This is the only knife placed on the left side of the setting.
Purpose: The bread plate serves to:
-
Provide a designated space for bread, rolls, or butter
-
Prevent crumbs or spreads from reaching the main plate or table
-
Support the flow of the meal without interfering with main courses
It adds both functionality and refinement to the setting.
When it is used and removed:
-
The bread plate is available from the beginning of the meal
-
It is used as needed throughout early and mid courses
-
It may remain on the table until the main course is completed, or it is cleared alongside earlier service items, depending on formality
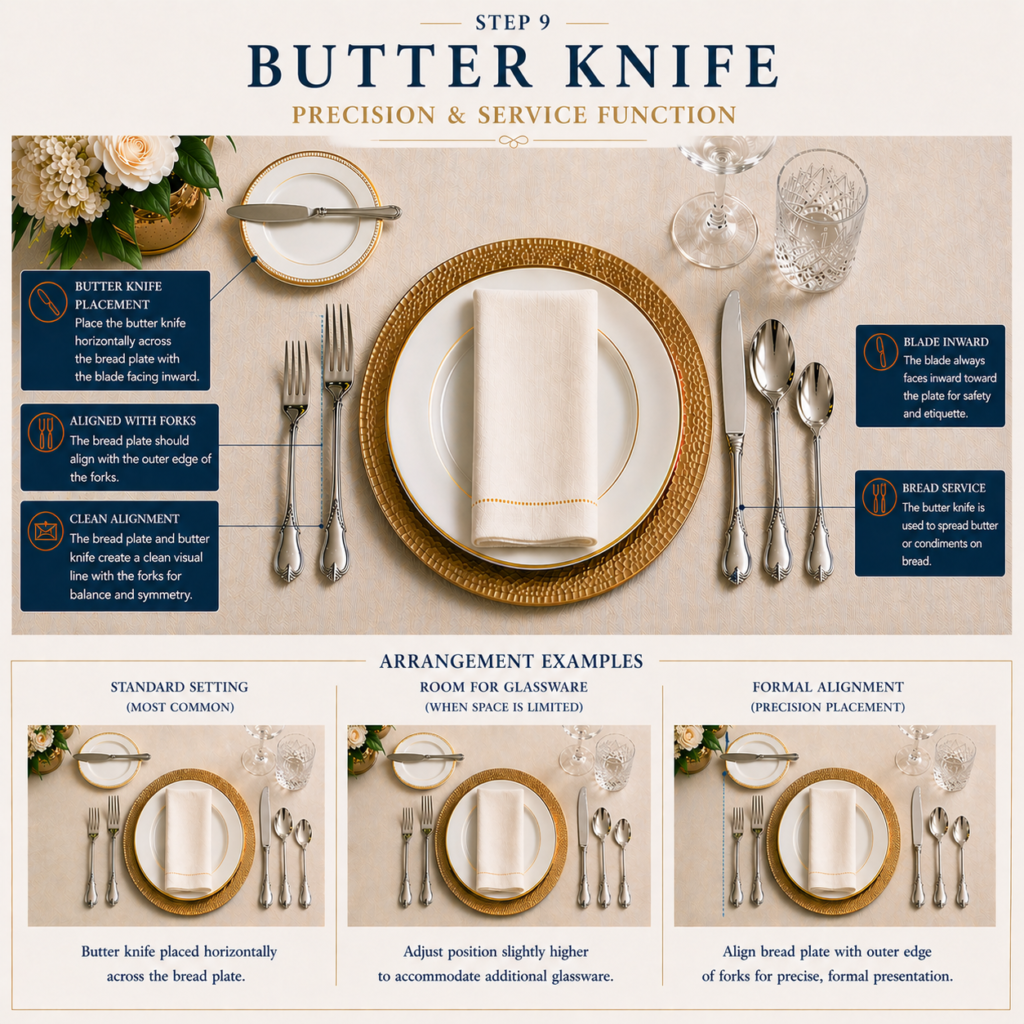
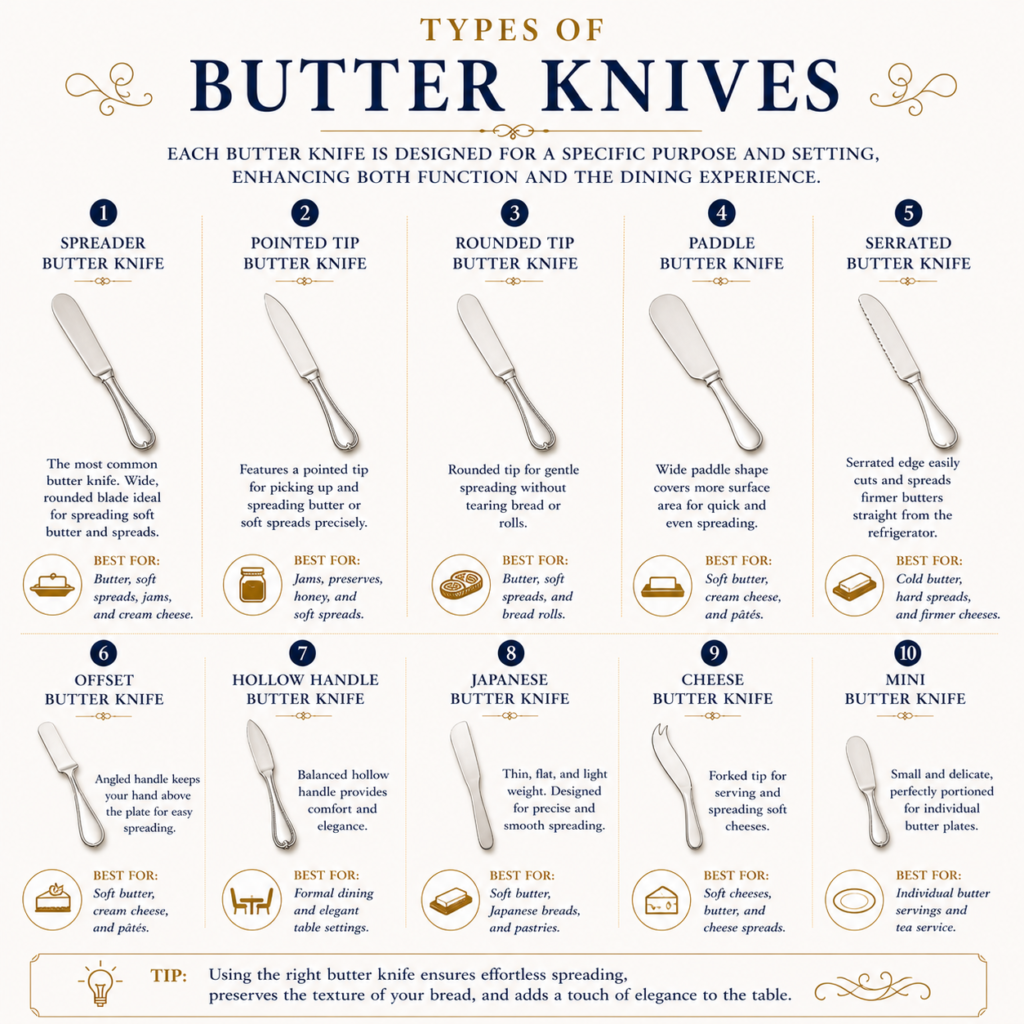
Step 9. Butter Knife
The butter knife (butter spreader) is placed as part of the initial setting and is used specifically for spreading butter or soft accompaniments onto bread. It completes the bread service and adds a refined, functional detail to the upper left portion of the setting.
Placement: The butter knife is placed horizontally across the top of the bread plate.
The handle points to the right
The blade faces downward toward the plate
This orientation keeps the working edge directed inward and maintains a clean, intentional presentation.
Alignment: The butter knife should align cleanly with the bread plate and overall structure.
It should sit centered across the upper portion of the bread plate
It should appear straight and level, not angled
This preserves a balanced and orderly appearance.
Material & Quality: Select a butter knife that matches the rest of the flatware.
Common materials include:
Stainless steel (most common and practical)
Silver-plated or sterling silver (more traditional and formal)
Ideal characteristics:
Smooth, rounded edge (not sharp)
Polished finish
Balanced weight
Consistent design with the flatware set
The butter knife should feel refined and cohesive, not like a separate or mismatched piece.
Design Distinction (Important): The butter knife is intentionally different from a dinner knife:
Shorter length
Rounded or softened blade edge
Designed for spreading, not cutting
This distinction is what separates it from a true bread knife.
Purpose: The butter knife serves to:
Spread butter, soft cheeses, or spreads
Keep dining utensils clean and course-specific
Support a neat and controlled dining experience
It is a specialized utensil that reinforces proper etiquette.
When it is used and removed:
Used whenever bread is served
Remains with the bread plate throughout the meal
Cleared together with the bread plate
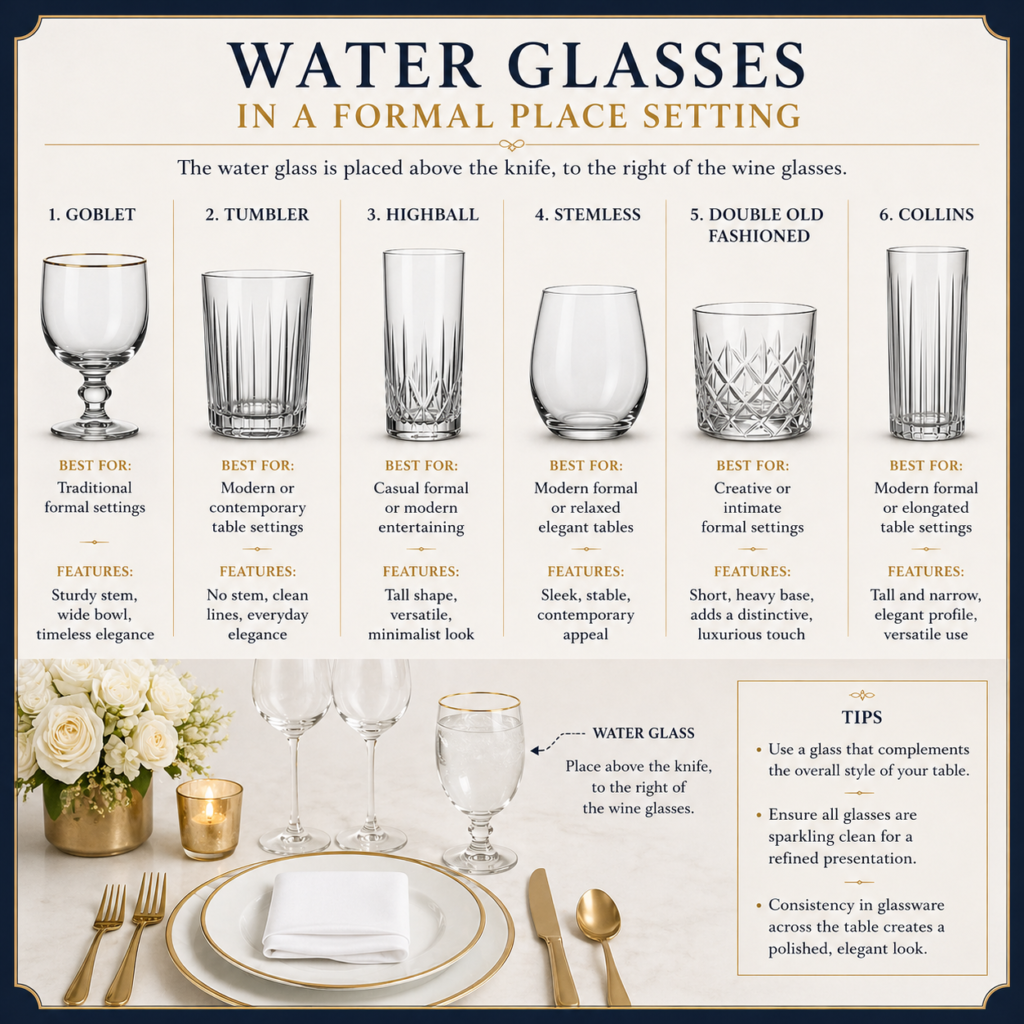
Step 10: Water Glass
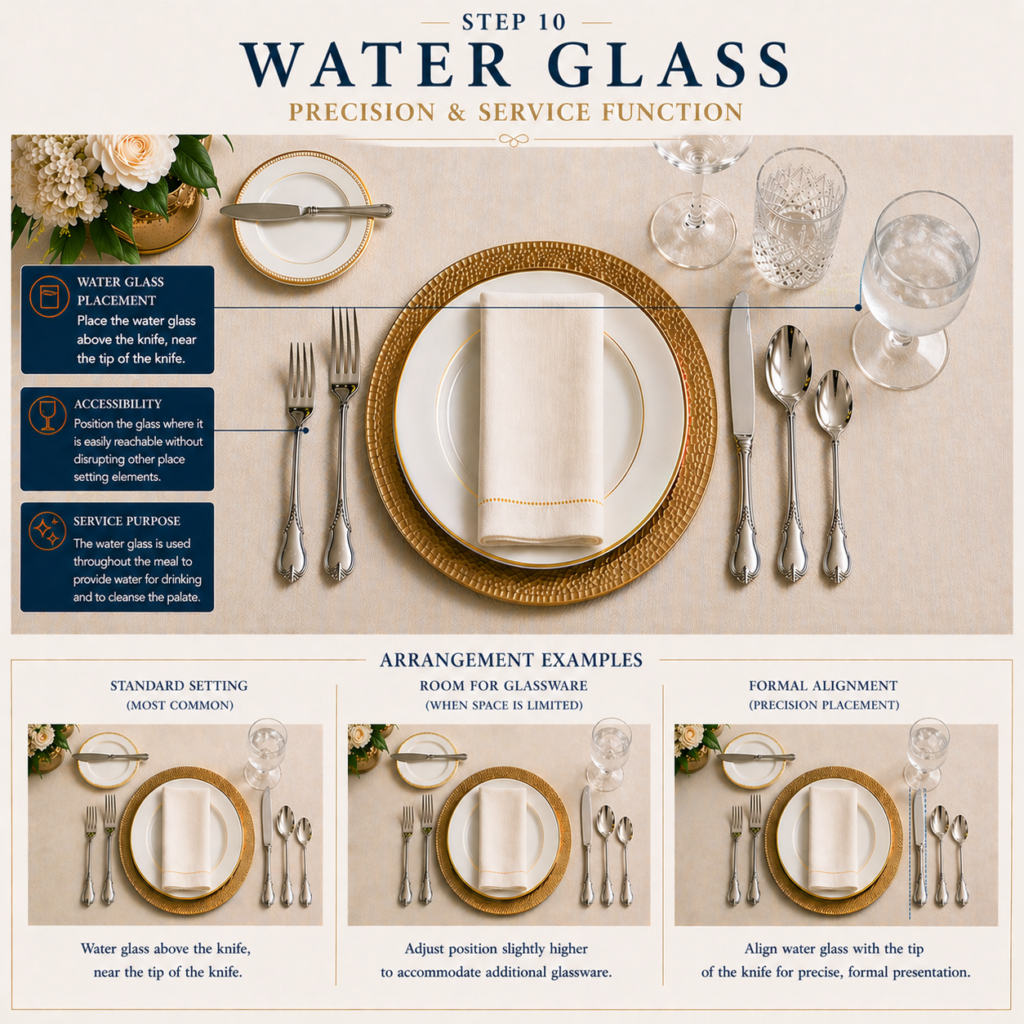
The water glass is placed as part of the initial setting and serves as the primary beverage vessel throughout the meal. It anchors the glassware arrangement and contributes to the overall elegance and vertical balance of the table.
Placement: The water glass is placed above and slightly to the right of the charger or plate, forming the foundation of the glassware cluster.
-
It sits directly above the knife or slightly above the tip of the dinner knife
-
It is typically the largest and most central glass in the grouping
Additional glasses (wine, champagne) are arranged around it, usually to the right and slightly below.
Alignment: The water glass should align with the overall structure of the setting while maintaining a natural, slightly angled grouping with other glassware.
-
The base should sit in line with the vertical axis of the plate or knife
-
When multiple glasses are present, they should form a clean diagonal or triangular arrangement
This preserves a balanced and intentional visual composition.
Material & Quality: Select a water glass of high-quality glass or crystal, depending on the level of formality.
Common options include: Crystal stemmed goblets (most traditional and formal)
-
High-quality clear glass (modern and refined)
-
Minimalist tumblers (acceptable in contemporary formal settings)
Ideal characteristics:
-
Clarity and brilliance
-
Smooth, even construction
-
Balanced weight
-
Consistent design with other glassware
The glass should feel substantial, clean, and cohesive with the overall table design.
Style Consideration: The choice of water glass should match the tone of the setting:
-
Traditional formal:
Stemmed water goblet
-
Modern formal:
Goblet or refined tumbler
Consistency across all glassware is key—avoid mixing unrelated styles.
Purpose: The water glass serves to:
-
Provide continuous hydration throughout the meal
-
Anchor the glassware arrangement visually
-
Add height and light reflection to the setting
It plays both a functional and aesthetic role.
When it is used and removed:
-
The water glass is available immediately upon seating
-
It remains on the table for the entire duration of the meal
-
It is typically one of the last items to be cleared
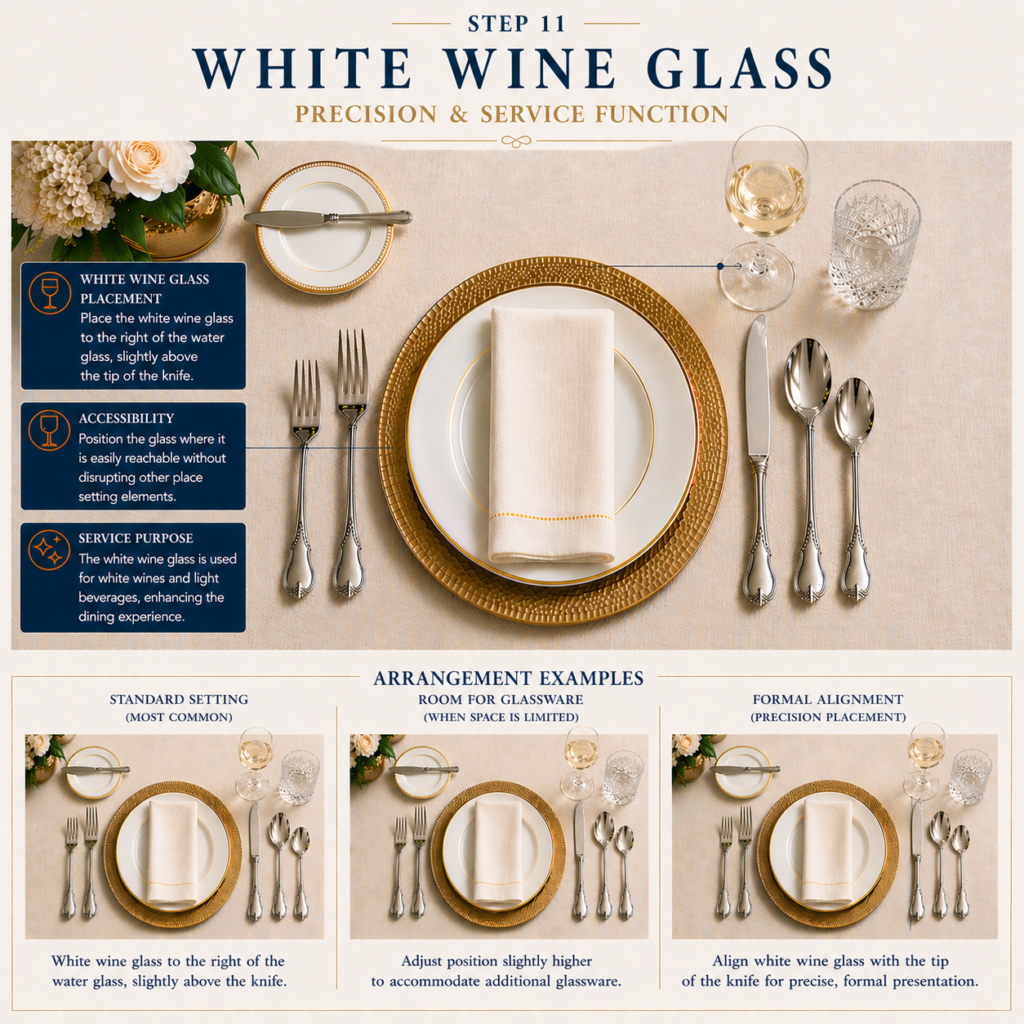
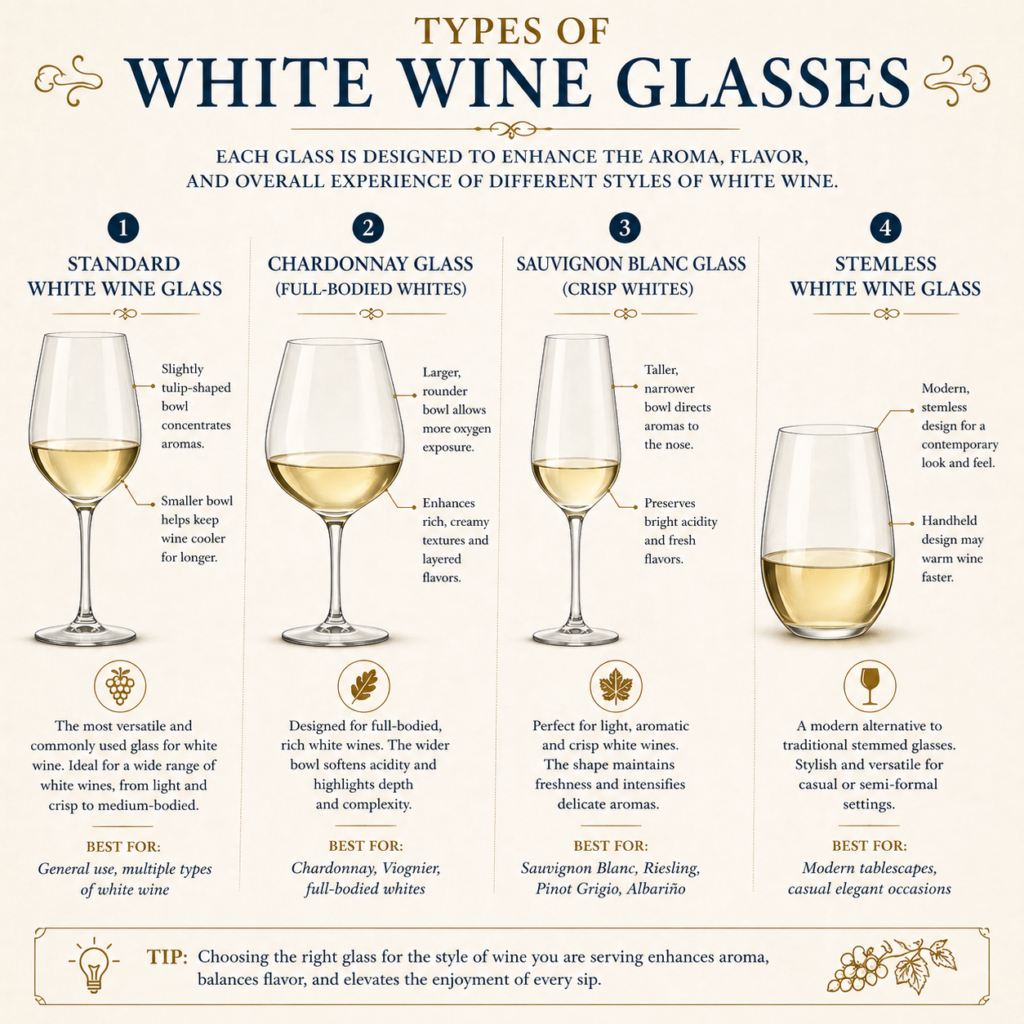
Step 11. White Wine Glass
The white wine glass is placed as part of the initial setting and corresponds to courses in which white wine is served. Its presence enhances both the sensory experience of the wine and the visual refinement of the table. Proper placement contributes to balance, symmetry, and clarity within the glassware arrangement.
Placement: The white wine glass is positioned to the right of the water glass. It typically sits slightly lower and to the right, forming a gentle diagonal line across the setting. When multiple wine glasses are present, they are arranged in the order of use, moving from left to right.
Alignment: All glassware should be arranged in clean, intentional alignment.
The bases should form a subtle, cohesive pattern—either a diagonal or slight arc. Spacing should be even, with each glass clearly distinguished yet visually connected to the others. This maintains a polished and harmonious presentation.
Material & Quality: Select glassware of high quality, typically:
-
Clear crystal (most refined and traditional)
-
Fine glass (practical and widely used)
Ideal characteristics:
-
Thin, smooth rim
-
Light yet balanced feel
-
Slender stem for proper handling
-
Clarity that allows the wine’s color to be appreciated
The glass should feel elegant, delicate, and cohesive with the overall table design.
Arrangement Consideration:
The number and type of wine glasses depend on the wines being served.
One glass (most common):
-
White wine glass only
Additional glasses (more formal):
-
Water glass (always present)
-
Red wine glass (placed to the right of the white wine glass)
Glassware is arranged to follow the progression of the meal, supporting a clear and intuitive experience.
Purpose: The white wine glass serves to:
-
Enhance the aroma and temperature of white wines
-
Provide a vessel proportioned for lighter-bodied wines
-
Contribute to the elegance and structure of the setting
Its smaller bowl helps preserve crispness and directs delicate aromas.
When it is used and removed: The white wine glass is used when white wine is served during the meal. It remains on the table throughout the course and may stay for the duration of the meal if appropriate. If no longer needed, it is typically cleared discreetly between courses.
Step 12. Red Wine Glass
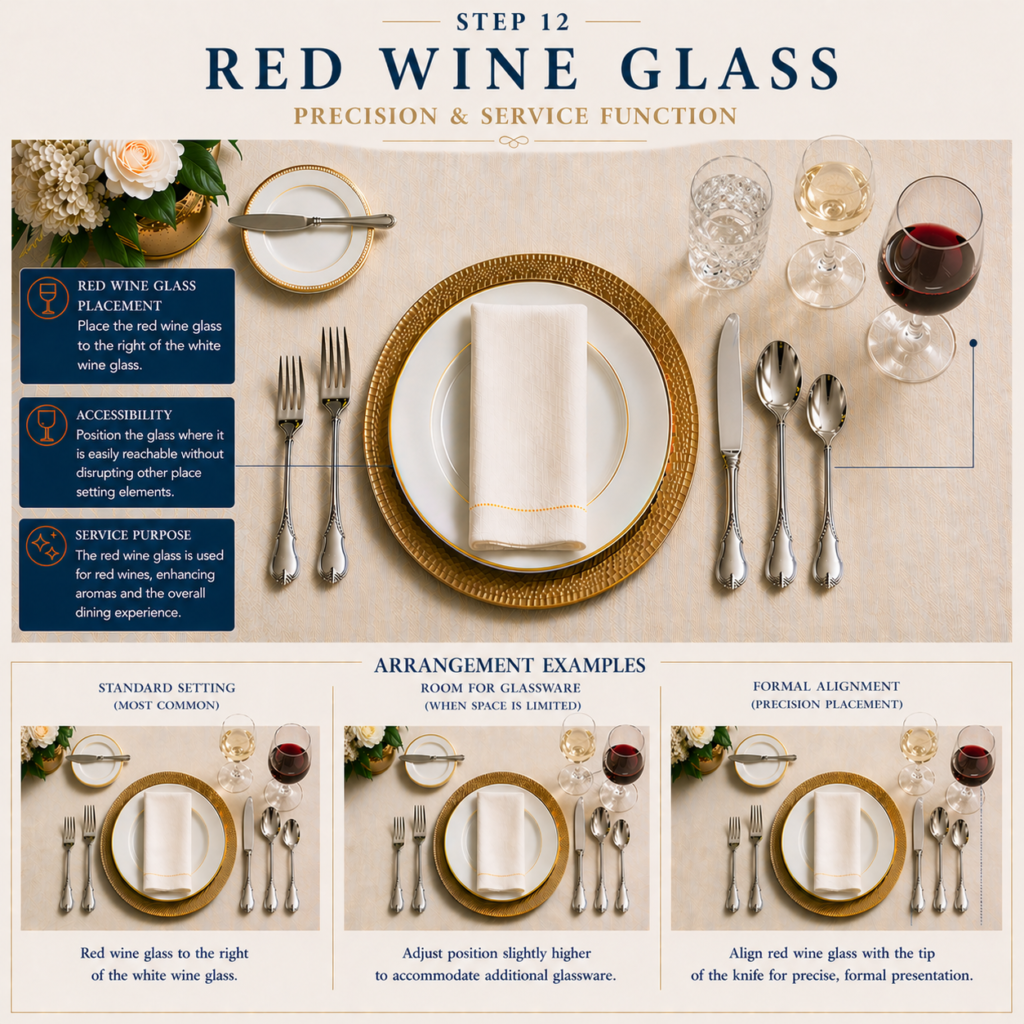
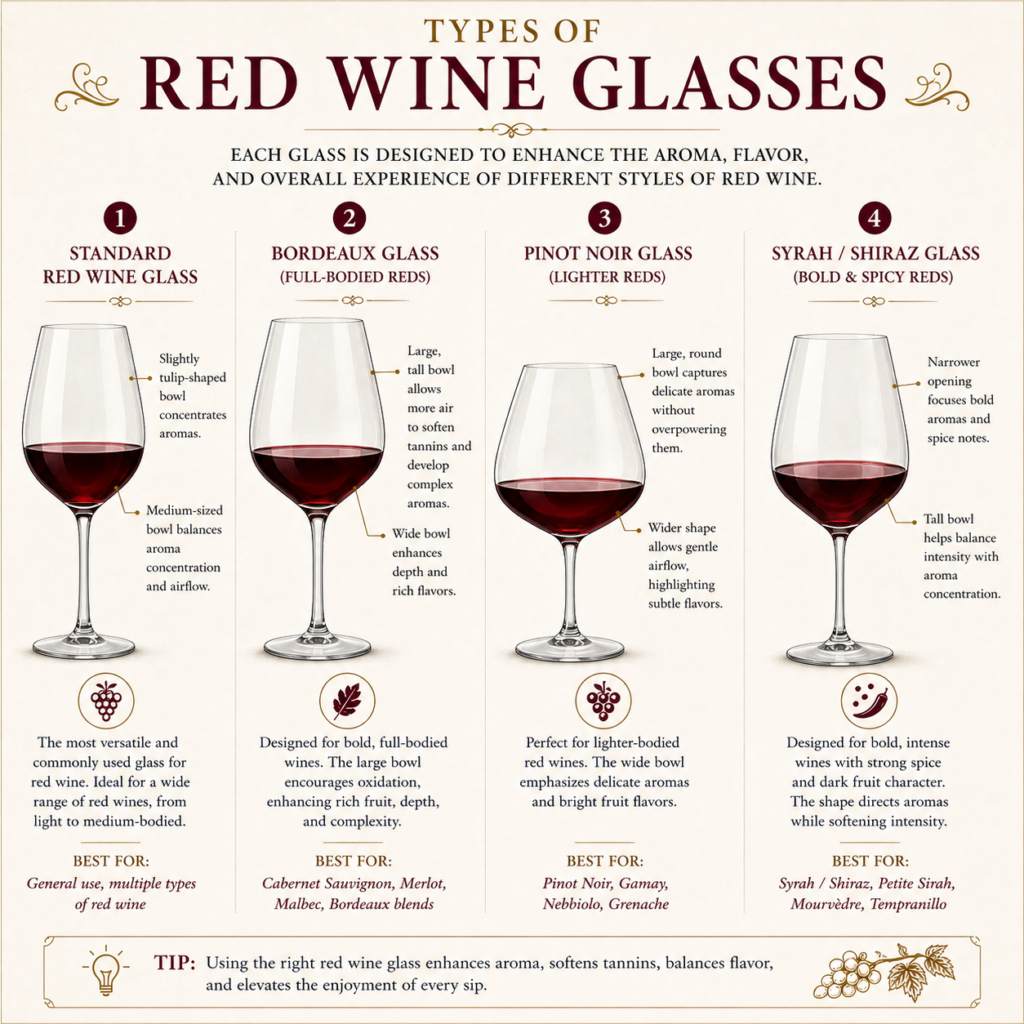
The red wine glass is placed as part of the initial setting when red wine is to be served. Its form and placement are designed to enhance the character of fuller-bodied wines while contributing to the overall balance and sophistication of the table.
Placement: The red wine glass is positioned to the right of the white wine glass. It typically sits slightly higher and further to the right, completing the diagonal or triangular arrangement of the glassware. When multiple glasses are present, they are arranged in the order of use from left to right.
Alignment: All glassware should maintain a clean and intentional alignment.
The bases should form a subtle diagonal line or gentle arc. Spacing should be even, ensuring clarity between each glass while preserving visual harmony. This creates a structured and elegant presentation.
Material & Quality: Select glassware of high quality, typically:
-
Crystal (most refined and traditional)
-
Fine glass (practical and widely used)
Ideal characteristics:
-
Larger, rounded bowl to allow aeration
-
Thin, smooth rim
-
Balanced, comfortable weight
-
Slender stem for proper handling
The glass should feel substantial yet refined, complementing both the wine and the setting.
Arrangement Consideration: The number and type of wine glasses depend on the courses being served.
One glass:
-
Red wine glass (if only red wine is served)
Additional glasses (more formal):
-
Water glass
-
White wine glass
-
Red wine glass (placed furthest to the right)
Glassware is arranged to reflect the progression of the meal and wines.
Purpose: The red wine glass serves to:
-
Enhance the aroma and depth of red wines
-
Allow proper aeration through a larger bowl
-
Support the structure and elegance of the place setting
Its shape encourages the full expression of the wine’s character.
When it is used and removed: The red wine glass is used when red wine is served during the meal. It remains in place throughout its course and may stay for the duration of the dining experience. If no longer needed, it is typically cleared between courses with discretion.
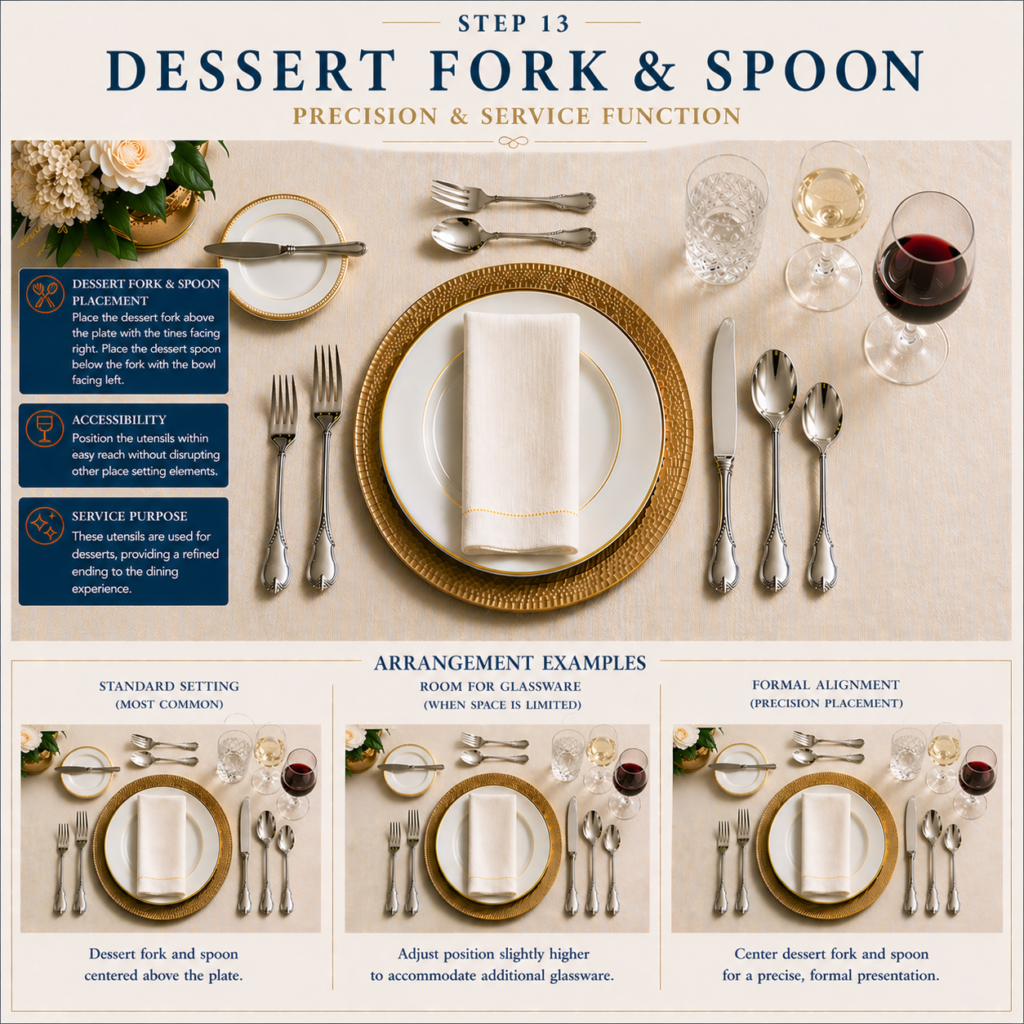
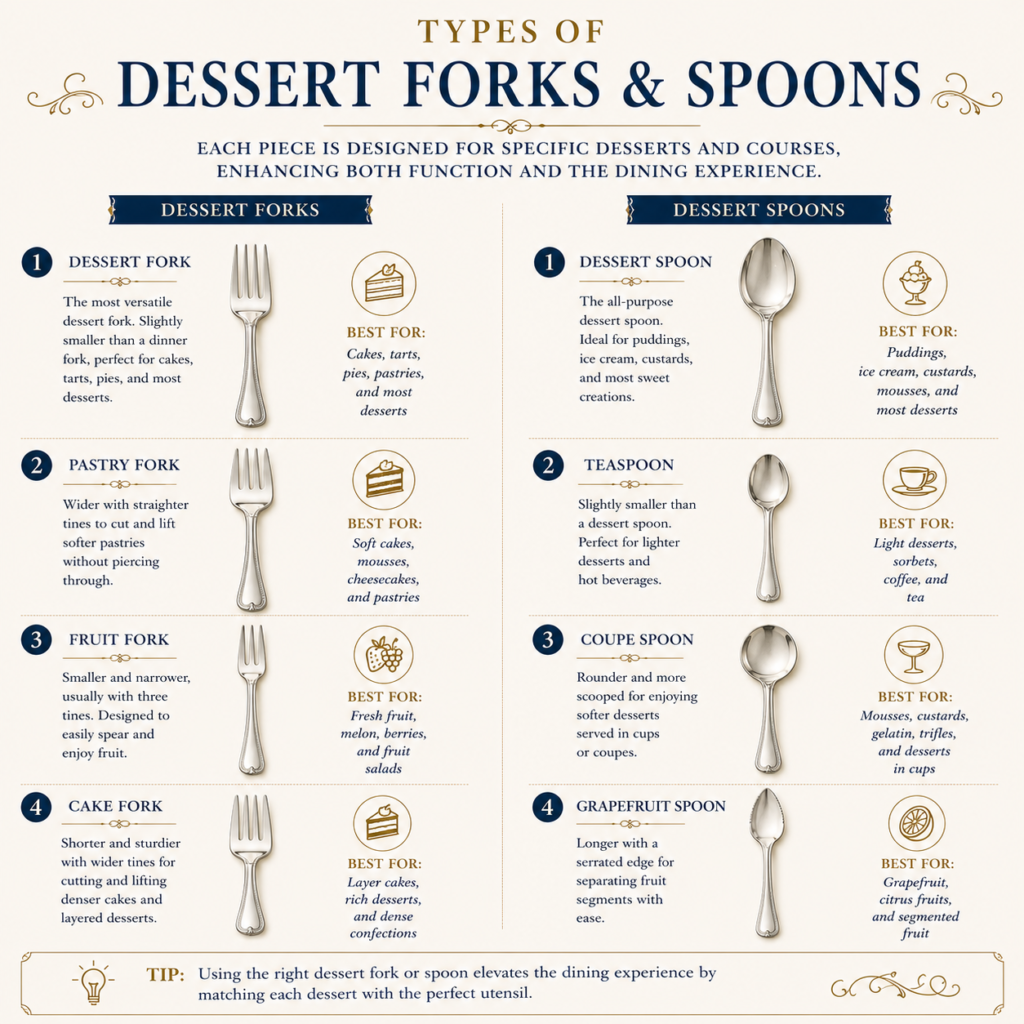
Step 13. Dessert Spoon & Fork
The dessert spoon and fork are typically placed as part of the initial setting in more formal arrangements or brought out with the dessert course. Their placement signifies the final stage of the meal and completes the full progression of service while maintaining balance and visual refinement.
Placement: The dessert spoon and fork are positioned horizontally above the dinner plate. The spoon is placed closest to the plate with the handle facing right. The dessert fork is placed above the spoon with the handle facing left. This opposing orientation allows each utensil to be easily taken in the correct hand.
Alignment: Both utensils should be centered above the plate. They should form clean, parallel horizontal lines. Spacing between the spoon and fork should be even and consistent. Their placement should align visually with the center of the plate below, maintaining symmetry across the setting.
Material & Quality: Select high-quality flatware consistent with the rest of the setting, typically:
-
Stainless steel (most common and practical)
-
Silver-plated or sterling silver (more traditional and formal)
Ideal characteristics:
-
Smooth, polished surfaces
-
Balanced weight
-
Refined proportions smaller than dinner flatware
-
Cohesive design with the full set
The utensils should feel precise, elegant, and proportionate to their purpose.
Arrangement Consideration: The use of pre-set dessert utensils depends on the level of formality.
Pre-set (more formal or structured settings):
-
Dessert spoon and fork placed above the plate
Not pre-set (common in many formal services):
-
Utensils are brought out with the dessert course
Some menus may require only one utensil depending on the dessert being served.
Purpose: The dessert spoon and fork serve to:
-
Provide versatility for a range of desserts (soft, layered, or structured)
-
Support a clean and comfortable dining experience
-
Complete the visual and functional progression of the meal
Their dual presence allows flexibility in how the dessert is enjoyed.
When they are used and removed: The dessert utensils are used at the final course of the meal. Each utensil is taken in the appropriate hand based on its orientation. After the dessert course, they are cleared along with the dessert plate.
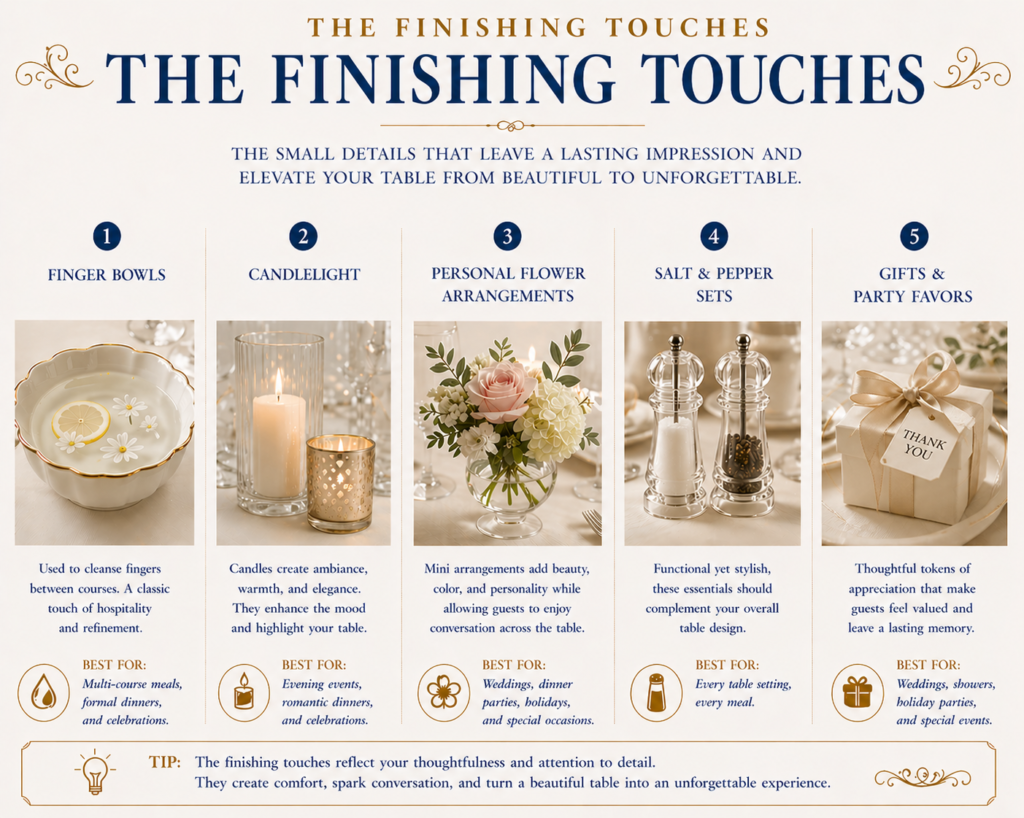
Step 14. Add the Finishing Touches
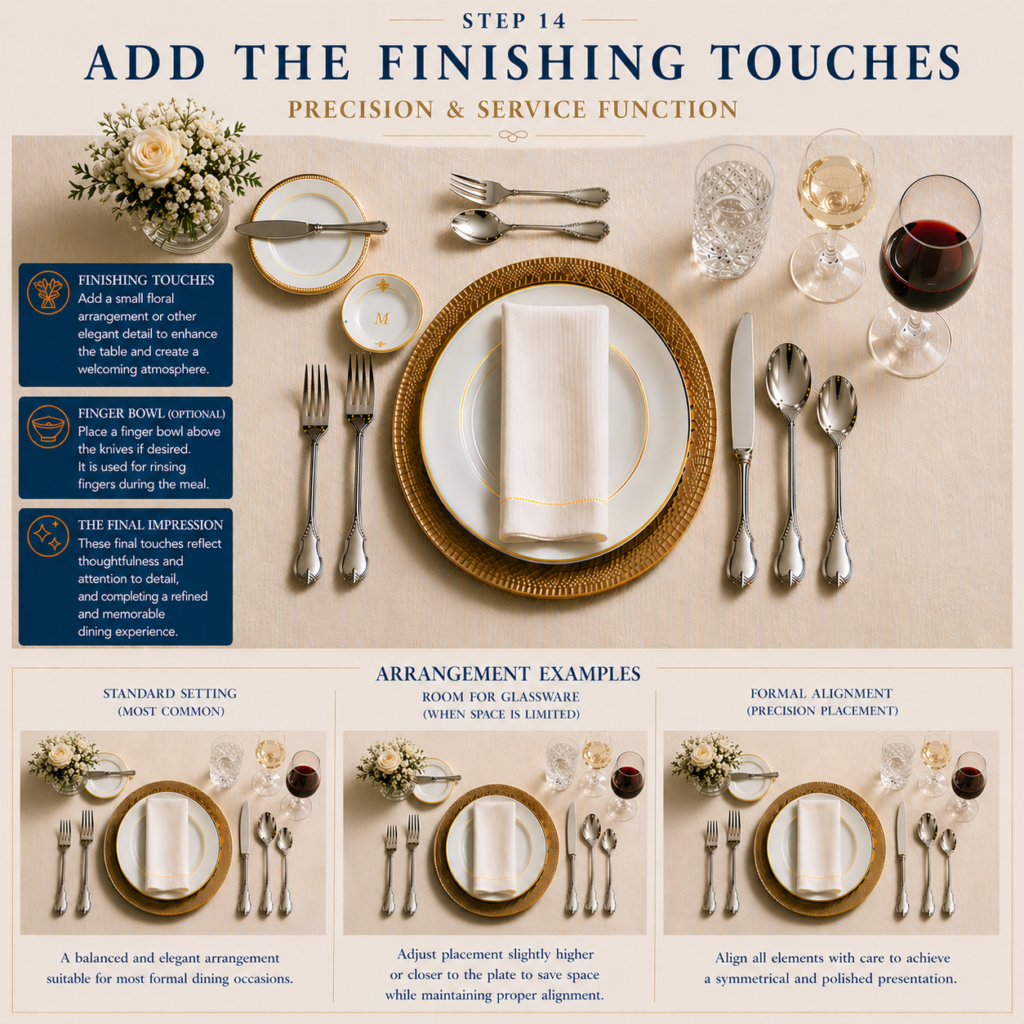
The finishing touches are the final elements added to a table setting, designed to elevate the experience beyond function into atmosphere and intention. While not required, these details bring warmth, personality, and refinement, transforming a well-set table into a memorable one.
Placement: Finishing elements should be placed thoughtfully so they enhance the setting without interfering with the dining space.
-
Small arrangements or accents are typically placed above the plate or slightly to the side
-
Items should never crowd the flatware or glassware
-
Each element should feel intentional and balanced within the setting
All additions should preserve the clarity and usability of the place setting.
Alignment: Decorative elements should follow the same principles as the rest of the table:
-
Maintain visual balance and symmetry across each place setting
-
Keep spacing consistent between items
-
Avoid clutter—each piece should have a defined place
The goal is refinement, not excess.
Material & Quality: Select items that complement the overall aesthetic of the table, typically:
-
Fresh florals or high-quality artificial arrangements
-
Glass, crystal, ceramic, or metal accents
-
Natural textures such as linen, wood, or subtle greenery
Ideal characteristics:
-
Clean, well-crafted appearance
-
Cohesive color palette
-
Proportional scale (nothing oversized or distracting)
Each piece should feel intentional, elegant, and integrated.
Arrangement Consideration: Finishing touches vary depending on the occasion and level of formality.
Common options include:
-
Small bouquet or floral arrangement (adds softness and visual interest)
-
Candlelight (adds warmth and ambiance)
-
Place cards (adds personalization and structure)
-
Gifts or party favors (adds a thoughtful, memorable element)
-
Finger bowls (optional, for highly formal or multi-course service)
Use restraint—one or two elements are often more effective than many.
Purpose: The finishing touches serve to:
-
Enhance the atmosphere and tone of the meal
-
Reflect care, intention, and hospitality
-
Personalize the dining experience
-
Complete the visual composition of the table
They bridge the gap between technical correctness and emotional impact.
When they are used and removed: Most finishing elements remain in place throughout the meal. Some items may be adjusted or removed as service progresses:
-
Place cards and favors typically remain
-
Finger bowls are introduced or used at specific moments
-
Candles remain lit throughout the dining experience
All elements should support the flow of the meal without distraction.
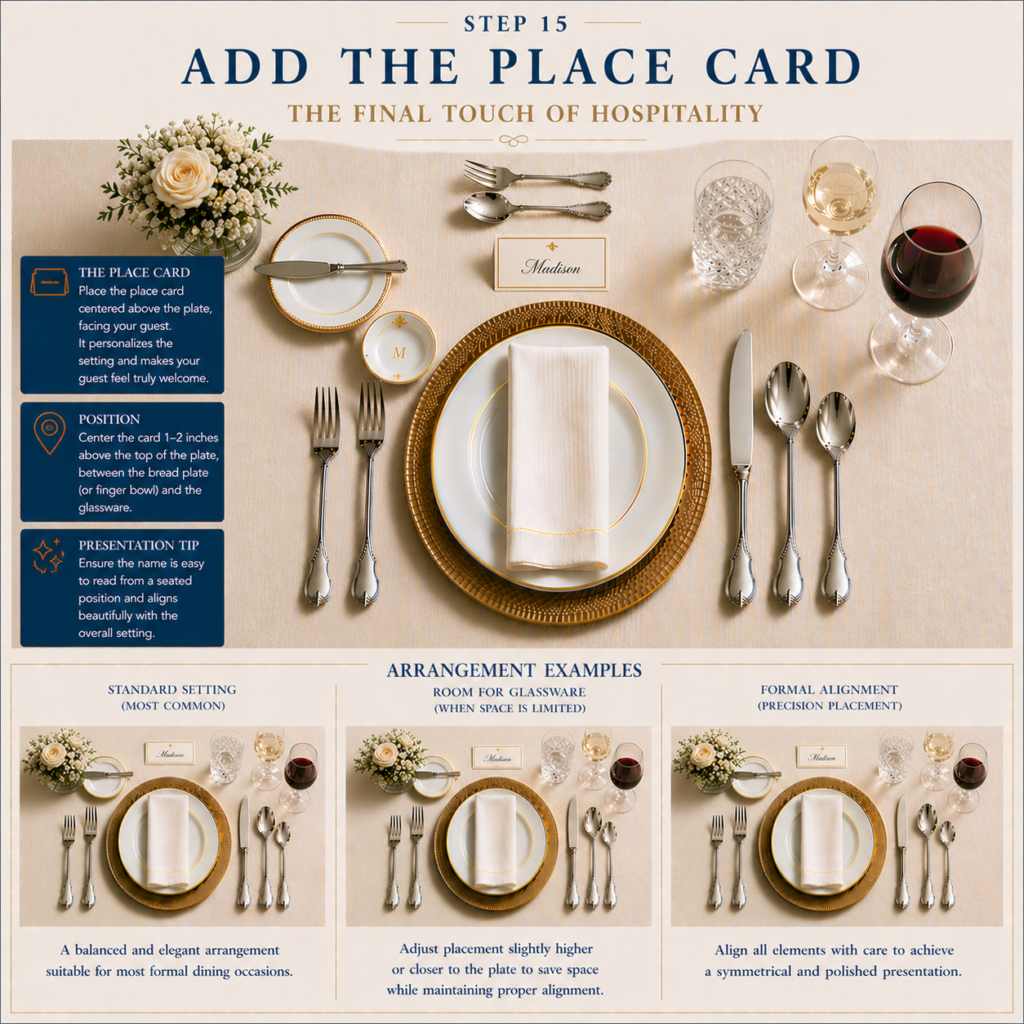
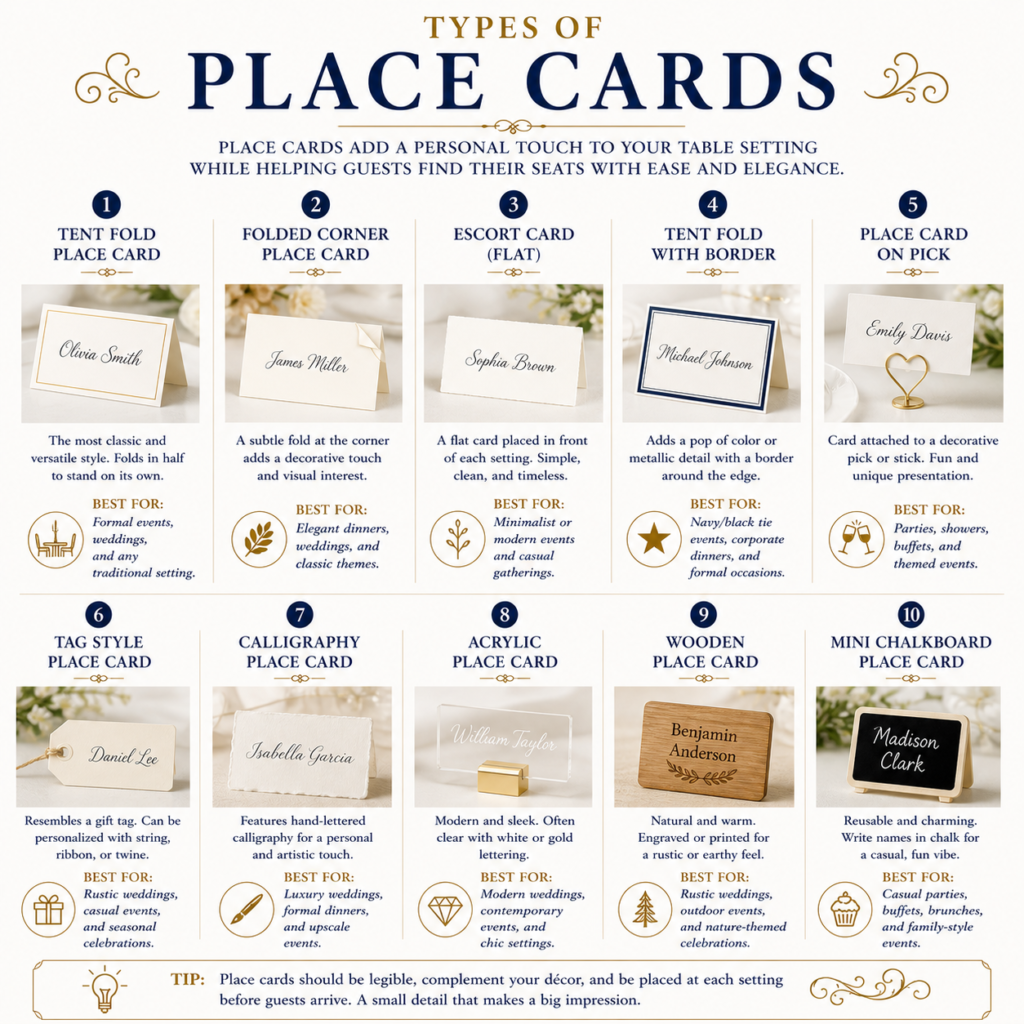
Step 15. The Place Card
The place card is a formal and functional element used to designate seating and guide guests to their assigned places. Beyond organization, it adds a layer of personalization and refinement, contributing to both the structure and elegance of the table.
Placement: The place card is typically positioned above the dinner plate. It may be centered directly above the plate or placed slightly behind the dessert utensils if they are pre-set. In some settings, it may also be placed on the napkin or charger for visual emphasis. Its placement should be immediately visible upon approach, allowing guests to locate their seat with ease.
Alignment: The place card should align with the center of the plate. It should sit straight and level, maintaining consistency across all place settings. Spacing between the place card and surrounding elements should be even and intentional. This ensures a clean, organized, and cohesive presentation.
Material & Quality: Select place cards that complement the overall aesthetic of the table, typically:
Folded cardstock (most common and traditional)
Handwritten or calligraphy cards (more formal and refined)
Printed cards with clean typography (modern and polished)
Ideal characteristics:
Legible, well-proportioned text
High-quality paper or material
Cohesive color palette with the table design
Clean, precise edges and structure
The place card should feel intentional, elegant, and thoughtfully prepared.
Arrangement Consideration: The style and use of place cards depend on the level of formality and size of the gathering. Common approaches:
Assigned seating (formal events): Each guest has a designated place card
Open seating (less formal): Place cards may be omitted or used decoratively
Escort cards (alternative): Guests find their seat via a separate display rather than at the table
Place cards can also be paired with small decorative elements or favors.
Purpose: The place card serves to:
Guide guests to their assigned seat
Support organization and flow of the event
Add a personalized and welcoming touch
Enhance the visual structure of the table setting
It provides both clarity and a sense of intentional hospitality.
When it is used and removed: The place card is used upon arrival to identify each guest’s seat. It typically remains in place throughout the meal. Guests may keep it as a memento, especially in more formal or celebratory settings.
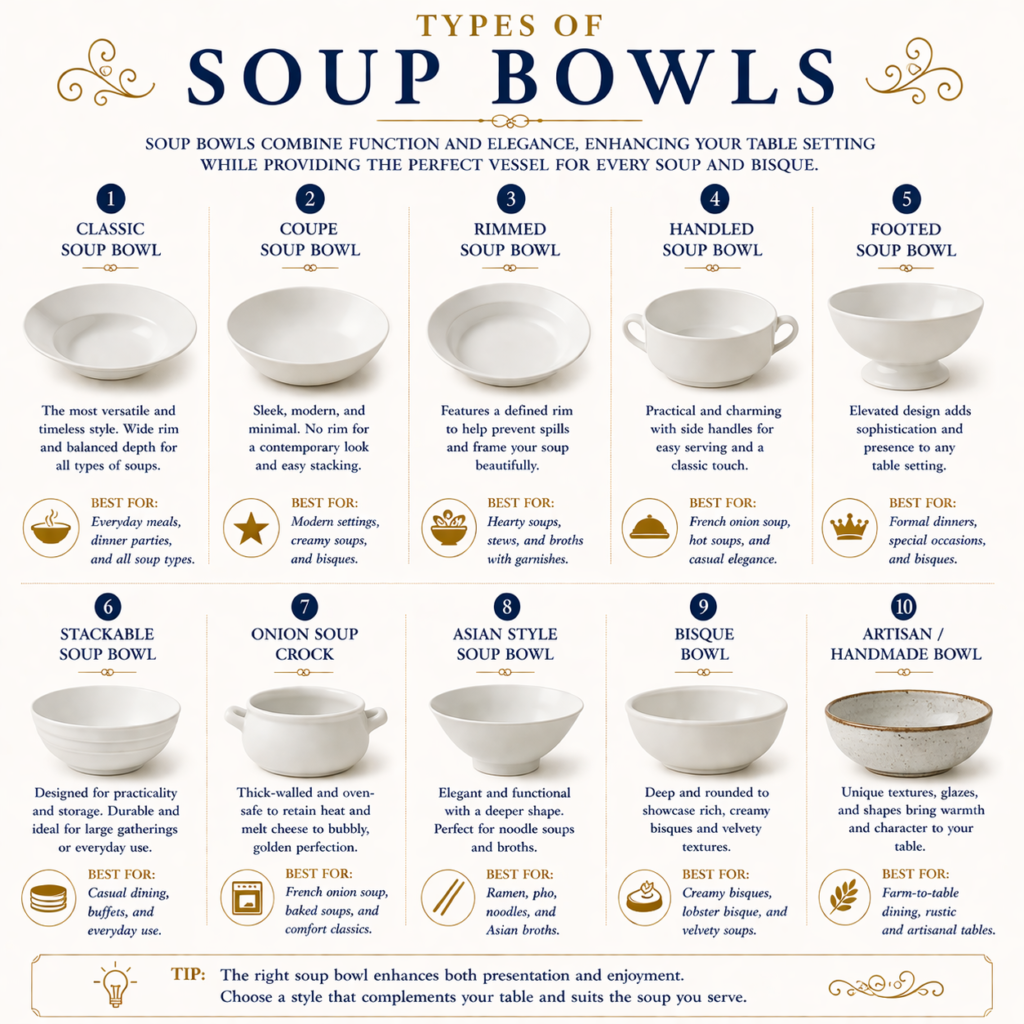
Additional Option: Soup Bowl
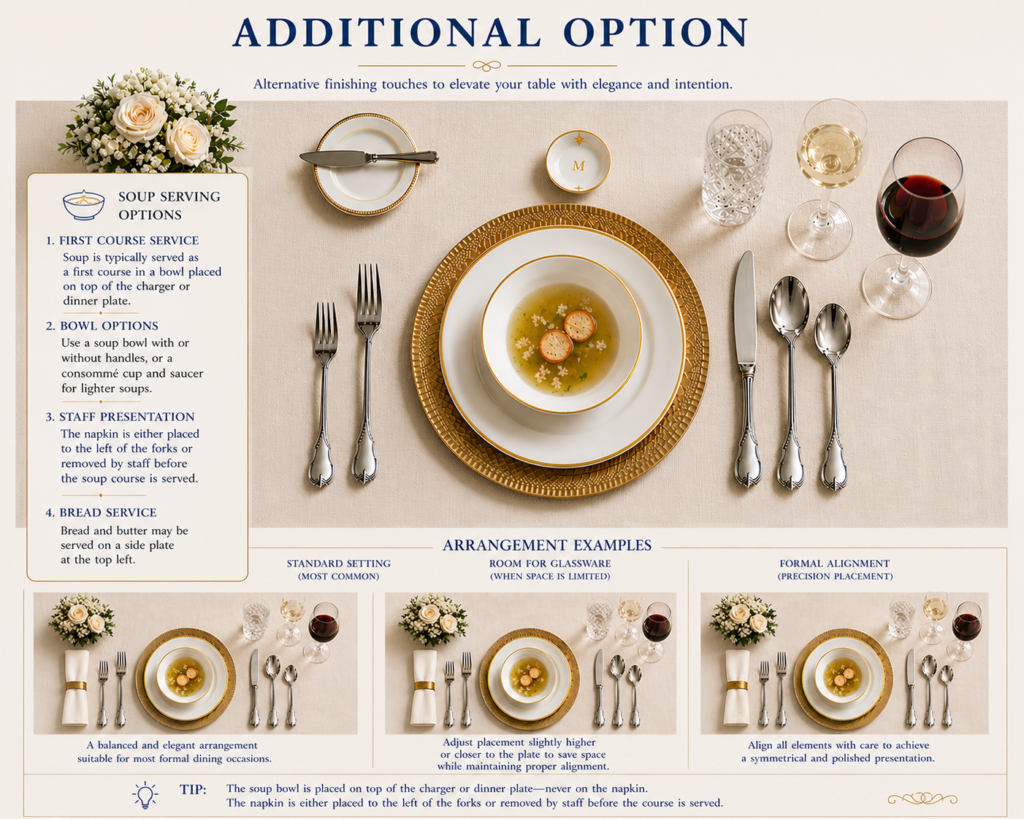
The soup bowl is an optional element introduced when a soup course is part of the meal. It is not typically part of the initial static setting but is instead added in coordination with service. Its presence reflects a more complete, multi-course dining experience and contributes to both the function and visual layering of the table.
Placement: The soup bowl is placed at the center of the setting, positioned on top of the dinner plate or charger. It should never be placed directly on a napkin. In more formal service, the bowl may be presented on an underplate before being set in position. The bowl is typically brought out filled and placed just before the course begins.
Alignment: The soup bowl should be centered precisely with the plate or charger beneath it. It should align with the vertical axis of the place setting, maintaining symmetry with the surrounding flatware and glassware. Any accompanying underplate should mirror this alignment. This preserves the structured and balanced appearance of the setting.
Material & Quality: Select soup bowls that complement the dinnerware, typically:
-
Porcelain or ceramic (most common and versatile)
-
Fine china (more formal and traditional)
Ideal characteristics:
-
Smooth, well-finished interior
-
Balanced weight and comfortable depth
-
Proportional size relative to the plate beneath
-
Cohesive design with the full place setting
The bowl should feel refined, durable, and visually integrated.
Arrangement Consideration: The method of serving soup varies depending on the level of formality and style of service. Common approaches include:
-
Pre-plated service (most common): Soup is served in the bowl before being brought to the table and placed directly on the charger or plate.
-
Tableside service (more formal): The bowl is placed empty, and soup is poured at the table from a tureen or service vessel.
-
Underplate presentation (refined service): The soup bowl is set on a small plate to catch drips and assist with handling.
-
Handled soup cup (alternative): A two-handled cup may be used for lighter soups or more delicate courses.
Each method reflects a different level of service and formality.
Purpose: The soup bowl serves to:
-
Present liquid or semi-liquid courses in a controlled and elegant manner
-
Support the progression of a multi-course meal
-
Add visual depth and layering to the place setting
It enhances both function and presentation within the dining experience.
When it is used and removed: The soup bowl is introduced at the beginning of the soup course. It is used with the outermost spoon placed to the right of the knives. After the course is completed, the bowl—along with any underplate—is removed before the next course is served. Any remaining flatware stays in place until needed.
Honoring Others with Your Manners